

JWT Authentication in Go: A Step-by-Step Guide
Building a Secure Authentication System with Go: A Step-by-Step Guide


Table of contents
- Introduction
- Architecture Overview
- Prerequisites
- Step 1: Initialize Your Project
- Step 2: Install Dependencies
- Explanation of the code:
- Step 3: Define User Model
- Explanation of the code:
- Step 4: Configure Database Connection
- Explanation of the code:
- Step 5: Setting Up a Test Route to Verify Application Setup
- Explanation of the code:
- Step 6: Setting Up Main Application Logic
- Explanation of the code:
- Test your server and connection setup
- Step 7: Implement Registration Functionality
- Explanation of the code:
- Test Registration via Postman
- Step 8: Implement Login Functionality
- Explanation of the code:
- Test Login via Postman
- Step 9: Implement User Retrieval Functionality
- Explanation of the code:
- Test Logged in User via Postman
- Step 10: Implement Logout Functionality
- Explanation of the code:
- Test Logging out via Postman
- Conclusion
Introduction
In this comprehensive guide, we'll walk through building a robust In this extensive tutorial, we'll delve into crafting a resilient authentication system in Golang, harnessing the power of:
The Fiber framework for streamlined HTTP handling,
GORM to proficiently manage our database interactions,
bcrypt for robust password hashing, and
JWT for secure token-based authentication.
By the conclusion of this blog, you'll possess a comprehensive grasp on how to seamlessly implement essential functionalities including:
User registration,
User login,
Retrieving logged-in user details, and
Effortlessly managing user logout sessions.
This repository contains the code for a JWT authentication project with frontend and backend components.
- Frontend (React): Frontend Repository
- Backend (Go): Backend Repository
Full project: GitHub Repository
Architecture Overview
In this architecture:
Server: Utilizes the Fiber framework to handle HTTP requests.
Routes: Define endpoints (/register, /login, /user, /logout) which are directed to corresponding controller actions.
Auth Controllers: Implement controller functions (Register, Login, User, Logout) responsible for handling specific authentication tasks.
Functionalities:
Register: Handles user registration, including validation and storing user data.
Login: Manages user authentication, verifying credentials and generating JWT tokens.
User: Retrieves user details, typically used for profile viewing or authentication verification.
Logout: Clears user session, usually by invalidating the JWT token.
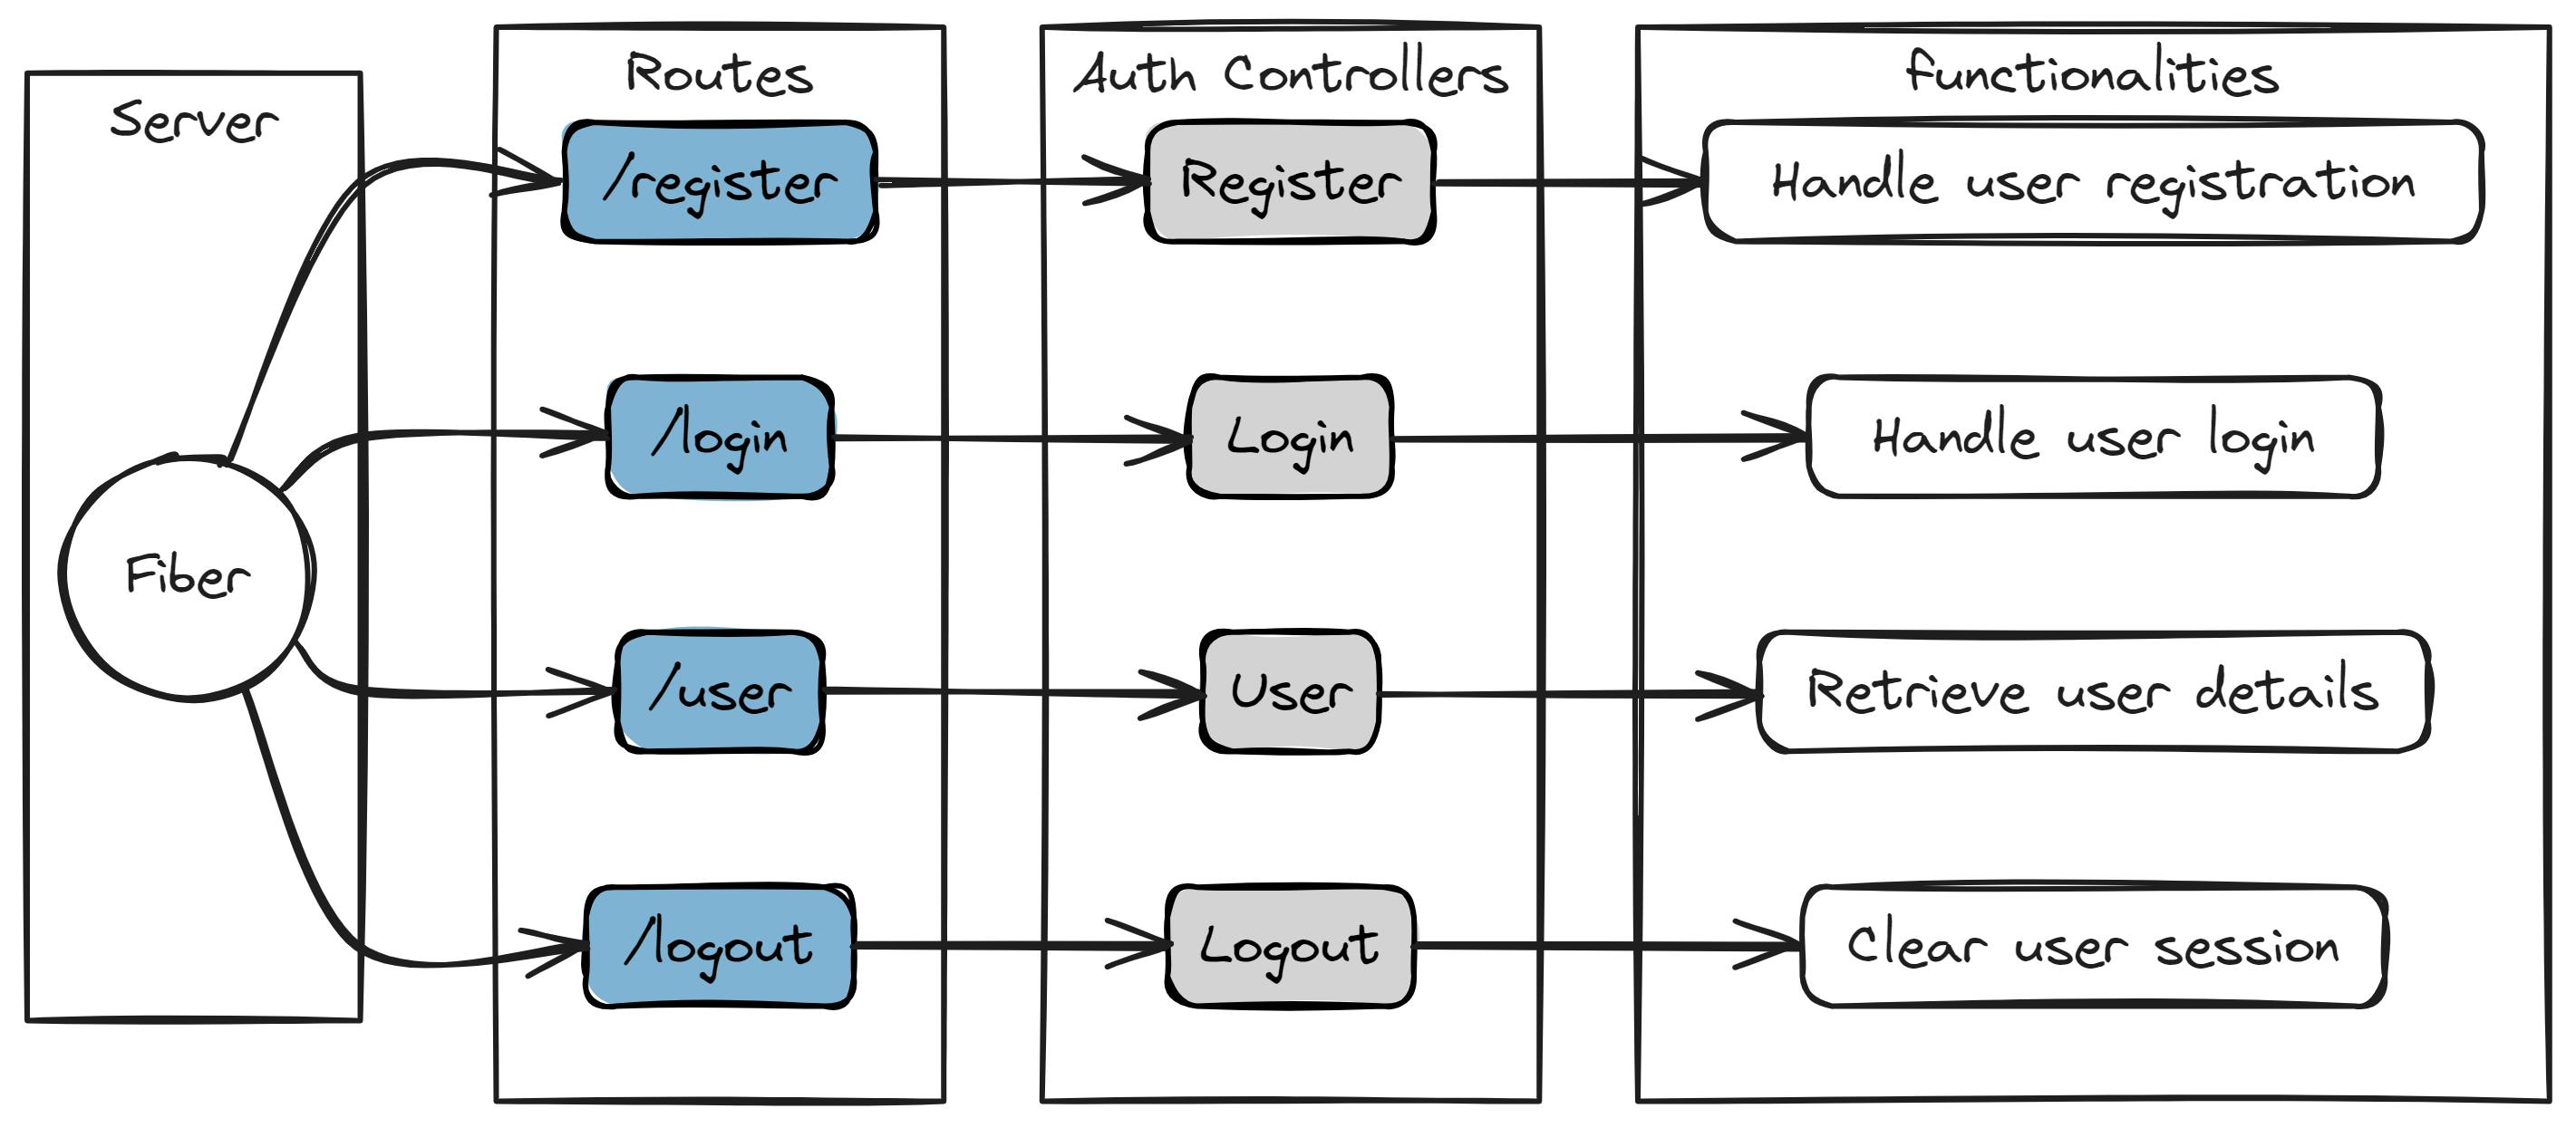
Each component works together to provide a comprehensive authentication system, ensuring secure user access and interaction with the application.
Prerequisites
Before we begin, ensure you have the following installed on your system:
Go:Download Go
MySQL (or any other supported database):
Note: Make sure to choose the appropriate version for your operating system.
MySQL Workbench (optional, for database management)
MySQL Workbench is a unified visual tool for database architects, developers, and DBAs.
Postman (optional, for API testing)
Postman is a collaboration platform for API development. It's useful for testing APIs and generating API documentation.
Step 1: Initialize Your Project
Initialize your project as a Go module: Execute the following command in your project directory:
go mod init <module-name>Replace
<module-name>with your project's name. For instance, if your project is named JWT-Authentication-go, the command would be:go mod init JWT-Authentication-goThis command creates two essential files:
go.mod: This file defines your project's module, including its name and dependencies.
go.sum: This file contains cryptographic checksums of dependencies, ensuring their integrity and security.
These files enable you to manage dependencies with Go modules, ensuring reproducibility and reliable builds across environments.
Folder Structure: Create the following directories in your project,
go.sumandgo.modshould be already created:JWT-Authentication-go ├── controllers │ └── authController.go ├── database │ └── connection.go ├── models │ └── user.go ├── routes │ └── routes.go ├── go.mod └── go.sum └── main.go
Step 2: Install Dependencies
Install the required packages using go get:
go get github.com/gofiber/fiber/v2
go get -u gorm.io/gorm
go get -u gorm.io/driver/mysql
go get golang.org/x/crypto/bcrypt
go get github.com/golang-jwt/jwt/v5
Explanation of the code:
These commands are used to install necessary Go packages for developing a web application:
github.com/gofiber/fiber/v2- Installs the Fiber web framework for building efficient web applications in Go.gorm.io/gorm- Installs the GORM library, an ORM (Object Relational Mapping) library for Go, used for interacting with databases.gorm.io/driver/mysql- Installs the MySQL driver for GORM, enabling GORM to work with MySQL databases.golang.org/x/crypto/bcrypt- Installs the bcrypt package from the Go Crypto library, commonly used for secure password hashing.github.com/golang-jwt/jwt/v5- Installs the JWT (JSON Web Tokens) library for Go, used for handling authentication and authorization through token-based authentication.
Step 3: Define User Model
GORM models are Go structs representing database tables. They enable seamless CRUD (Create, Read, Update, Delete) operations in Go, eliminating the need for direct SQL queries. This promotes cleaner, more maintainable code and simplifies database interactions in your applications.
Let's create a models package and define the user model:
// models/user.go
package models

type User struct {
    ID       uint   `gorm:"primaryKey;autoIncrement" json:"id"`
    Name     string `json:"name"`
    Email    string `gorm:"unique" json:"email"`
    Password []byte `json:"-"`
}
Explanation of the code:
The code defines a struct named User with fields representing user data.
Each field has a json tag indicating how it should be serialized/deserialized to/from JSON format.
The
Passwordfield is excluded (json:"-") from JSON encoding to prevent it from being exposed. It's stored as a byte slice ([]byte) for security, containing the hashed password.The
IDfield is marked as the primary key and set to auto-increment by GORM (gorm:"primaryKey;autoIncrement") to manage database interactions more efficiently.
Step 4: Configure Database Connection
Before proceeding, ensure you have set up a MySQL account, established a connection, and created a database schema. If you're unsure how to do this, you can follow the steps outlined in this guide:
Creating Your First MySQL Database with MySQL Workbench (Steps 1-3)
After setting up your MySQL environment, proceed by establishing a connection between your Go application and the database using the GORM library. Start by creating a dedicated database package in database directory and implement the connection function using GORM.
Here's how to set it up:
// database/connection.go

package database
// Import GORM and MySQL driver
import (
    "your-module-name/models"
    "gorm.io/gorm"
    "gorm.io/driver/mysql"
)

var DB *gorm.DB

// Connect to MySQL database
func ConnectDB() (*gorm.DB, error) {
    // Database configuration
    dsn := "user:password@tcp(localhost:3306)/dbname"

    // Connect to MySQL database
    db, err := gorm.Open(mysql.Open(dsn), &gorm.Config{})
    if err != nil {
        return nil, err
    }

    DB = db
    db.AutoMigrate(&models.User{})

    return db, nil
}
Make sure to replace user, password, and dbname with your actual MySQL credentials and database name. This function establishes a connection to the MySQL database using GORM.
Also ensure to replace your-module-name with the actual module name with which you initiated the project in Step 1.
Explanation of the code:
Variable
DBcreates a reference to aGORM databaseconnection that can be used throughout your application to perform database CRUD operations.AutoMigrateautomatically creates or updates database tables based on the provided Go structs (models).db.AutoMigrate(&models.User{})ensures that theUsermodel's corresponding table in the database (userdb) is created or updated to match the struct's fields.This means any changes to the struct will be reflected in the database schema without manual intervention.
Step 5: Setting Up a Test Route to Verify Application Setup
In this step, we will create a test route to ensure that our application setup is functioning correctly. The test route will simply return a "Hello world!!" message when accessed.
Define the Test Route Function in the Controller: Inside the
controllers/authController.gofile, create a new function namedHellothat returns the string "Hello world!!".// controllers/authController.go package controllers import "github.com/gofiber/fiber/v2" // Hello returns a simple "Hello world!!" message func Hello(c *fiber.Ctx) error { return c.SendString("Hello world!!") }Update the Routes to Include the Test Route: Open the
routes/routes.gofile and import thecontrollerspackage. Then, add a new route for the/endpoint that calls theHellofunction from thecontrollerspackage.// routes/routes.go package routes import ( "github.com/gofiber/fiber/v2" "your-module-name/controllers" // Replace "your-module-name" with the actual module name ) // SetUpRoutes sets up all the routes for the application func SetUpRoutes(app *fiber.App) { // Test route to verify application setup app.Get("/", controllers.Hello) }
Explanation of the code:
In the routes/routes.go file, the route for the root endpoint /, invokes the route handler function Hello from controllers/authController.go file returns the string "Hello world!!" when called.
Step 6: Setting Up Main Application Logic
Now let's connect to the DB and check if our Table is created
// main.go
package main

import (
    "your-module-name/database"
    "your-module-name/routes"
    "fmt"
    "github.com/gofiber/fiber/v2"
    "github.com/gofiber/fiber/v2/middleware/cors"
)

func main() {
    // Connect to the database
    _, err := database.ConnectDB()
    if err != nil {
        // If unable to connect, panic
        panic("could not connect to db")
    }
    // Print a success message if connection is successful
    fmt.Println("Connection is successful")

    // Initialize Fiber app
    app := fiber.New()

    // Adding CORS middleware with specific origin
    app.Use(cors.New(cors.Config{
        AllowMethods:     "GET,POST,PUT,DELETE,PATCH,OPTIONS",
        AllowHeaders:     "Content-Type,Authorization,Accept,Origin,Access-Control-Request-Method,Access-Control-Request-Headers,Access-Control-Allow-Origin,Access-Control-Allow-Headers,Access-Control-Allow-Methods,Access-Control-Expose-Headers,Access-Control-Max-Age,Access-Control-Allow-Credentials",
        AllowCredentials: true,
    }))

    // Setup routes
    routes.SetupRoutes(app)

    // Start the server
    err = app.Listen(":8000")
    if err != nil {
        // If unable to start the server, panic
        panic("could not start server")
    }
}
Explanation of the code:
The main() function serves as the entry point of the application.
It begins by attempting to connect to the database using
database.ConnectDB().If the connection fails, it panics with an error message.
If the database connection is successful, it prints a success message.
Next, it initializes a new instance of the
Fiberapp.The app uses the CORS middleware to allow cross-origin requests
It sets up routes by calling
routes.SetupRoutes(app).
Finally, it starts the server on port
8000usingapp.Listen(":8000").- If starting the server fails, it panics with an error message.
Test your server and connection setup
- On command line to to you root directory and run
go run main.go
Your server is now running at http://localhost:8000/
- You may see below screenshot on the screen

That shows that your connection to database was successful
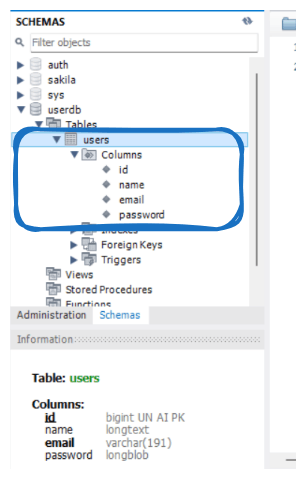
- You may also check the same in mySQL workbench that your
usertable is now created.
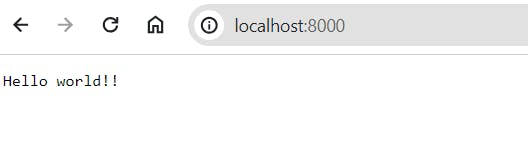
- If you completed Step5, you can now see the following at http://localhost:8000/ if your routes are working correctly.
Step 7: Implement Registration Functionality
- Create a
controllerspackage and implement the registration function:
// controllers/authController.go

package controllers

import (
    "github.com/gofiber/fiber/v2"
    "your-module-name/database"
    "your-module-name/models"
)

func Register(c *fiber.Ctx) error {
    fmt.Println("Received a registration request")

    // Parse request body
    var data map[string]string
    if err := c.BodyParser(&data); err != nil {
        return c.Status(fiber.StatusBadRequest).JSON(fiber.Map{
            "error": "Failed to parse request body",
        })
    }

    // Check if the email already exists
    var existingUser models.User
    if err := database.DB.Where("email = ?", data["email"]).First(&existingUser).Error; err == nil {
        return c.Status(fiber.StatusBadRequest).JSON(fiber.Map{
            "error": "Email already exists",
        })
    }

    // Hash password
    hashedPassword, err := bcrypt.GenerateFromPassword([]byte(data["password"]), bcrypt.DefaultCost)
    if err != nil {
        return c.Status(fiber.StatusInternalServerError).JSON(fiber.Map{
            "error": "Failed to hash password",
    }

    // Create new user
    user := models.User{
        Name:     data["name"],
        Email:    data["email"],
        Password: string(hashedPassword),
    }

    // Insert user into database
    if err := db.Create(&user).Error; err != nil {
        return c.Status(fiber.StatusInternalServerError).JSON(fiber.Map{
            "error": "Failed to create user",
    }

    return c.JSON(fiber.Map{
        "message": "User registered successfully",
    })
}
Add the new registration router in routes package. Your
SetupRoutesfunction will now look like below// routes/routes.go func SetupRoutes(app *fiber.App) { app.Get("/", controllers.Hello) app.Post("/api/register", controllers.Register) }
Explanation of the code:
Input Parsing: The
Registerfunction parses the request body into a map of strings using Fiber'sBodyParser, facilitating easy access to request data.Database Interaction: It checks for existing user emails in the database using GORM's
Wheremethod, returning an error if a user with the same email already exists.Password Hashing: Passwords are securely hashed using
bcrypt.GenerateFromPassword, enhancing security by preventing plaintext storage.User Creation: After hashing the password, a new
models.Userobject is created and inserted into the database using GORM'sCreatemethod.Error Handling: Errors are handled to return appropriate HTTP status codes and JSON-formatted error messages, ensuring informative responses to clients.
Response: Upon successful registration, a JSON response confirming the registration is returned to the client.
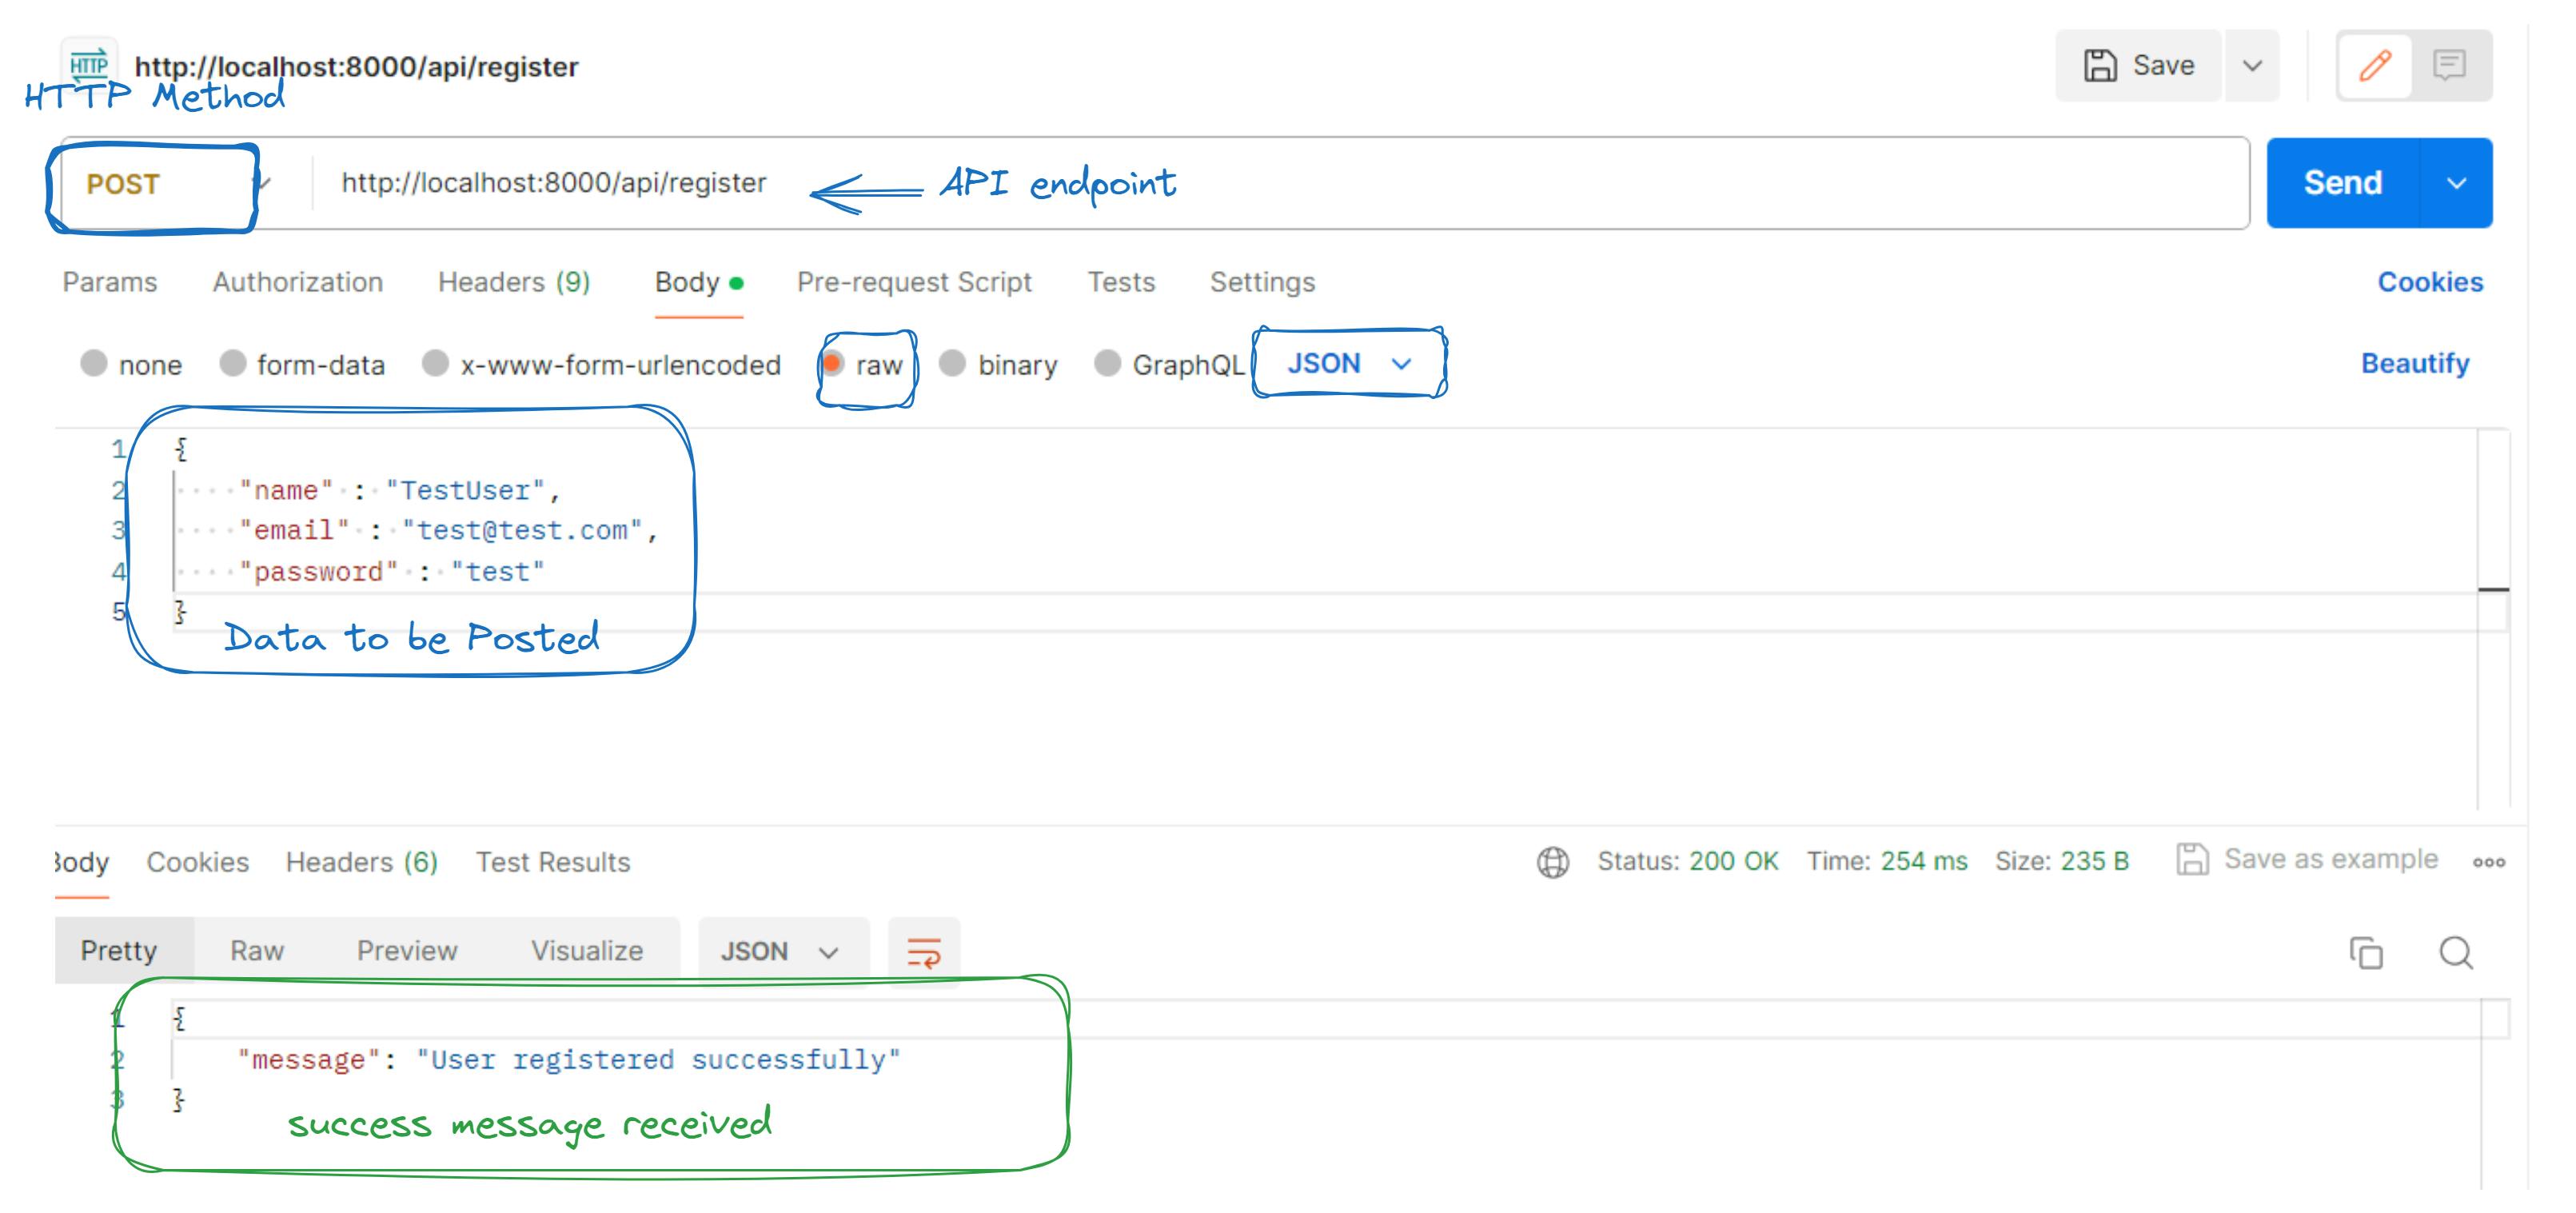
Test Registration via Postman
Open Postman: Launch Postman.
Set Request Details:
Method:
POSTBody: radio button
raw, typeJSON- Include
name,email, andpasswordfields
- Include
Send Request: Click "Send".
Check Response: Verify the response:
Successful registration: Status code
200 OKwith a success message.Errors: Appropriate status code and error message.
- Verify Registration: Check the database in mySQL workbenchor make additional requests to confirm the registration.
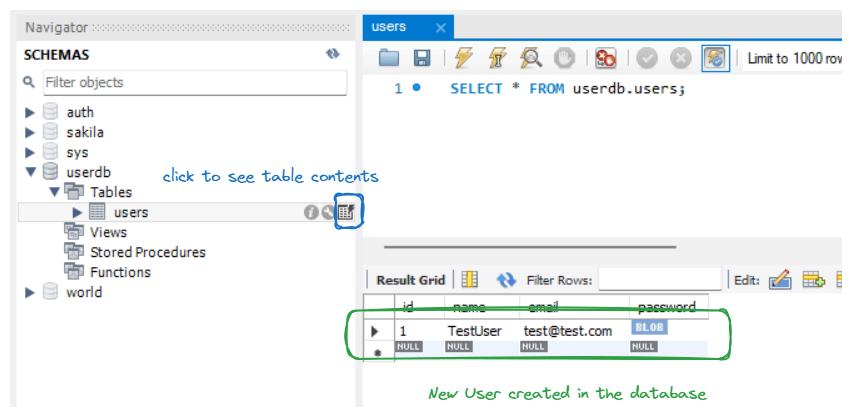
These steps allow you to efficiently test the registration functionality using Postman, ensuring proper communication between the client and server.
Step 8: Implement Login Functionality
Now you have created a user, let's log that user in.
- Add the login function in the
controllerspackage:
// controllers/authController.go
func Login(c *fiber.Ctx) error {
fmt.Println("Received a Login request")
// Parse request body
var data map[string]string
if err := c.BodyParser(&data); err != nil {
return c.Status(fiber.StatusBadRequest).JSON(fiber.Map{
"error": "Failed to parse request body",
})
}
// Check if user exists
var user models.User
database.DB.Where("email = ?", data["email"]).First(&user)
if user.ID == 0 {
fmt.Println("User not found")
return c.Status(fiber.StatusUnauthorized).JSON(fiber.Map{
"message": "Invalid credentials",
})
}
// Compare passwords
err := bcrypt.CompareHashAndPassword([]byte(user.Password), []byte(data["password"]))
if err != nil {
fmt.Println("Invalid Password:", err)
return c.Status(fiber.StatusUnauthorized).JSON(fiber.Map{
"message": "Invalid credentials",
})
}
// Generate JWT token
claims := jwt.NewWithClaims(jwt.SigningMethodHS256, jwt.MapClaims{
"sub": strconv.Itoa(int(user.ID)),
"exp": time.Now().Add(time.Hour * 24).Unix(), // Expires in 24 hours
})
token, err := claims.SignedString([]byte(secretKey))
if err != nil {
fmt.Println("Error generating token:", err)
return c.Status(fiber.StatusInternalServerError).JSON(fiber.Map{
"error": "Failed to generate token",
})
}
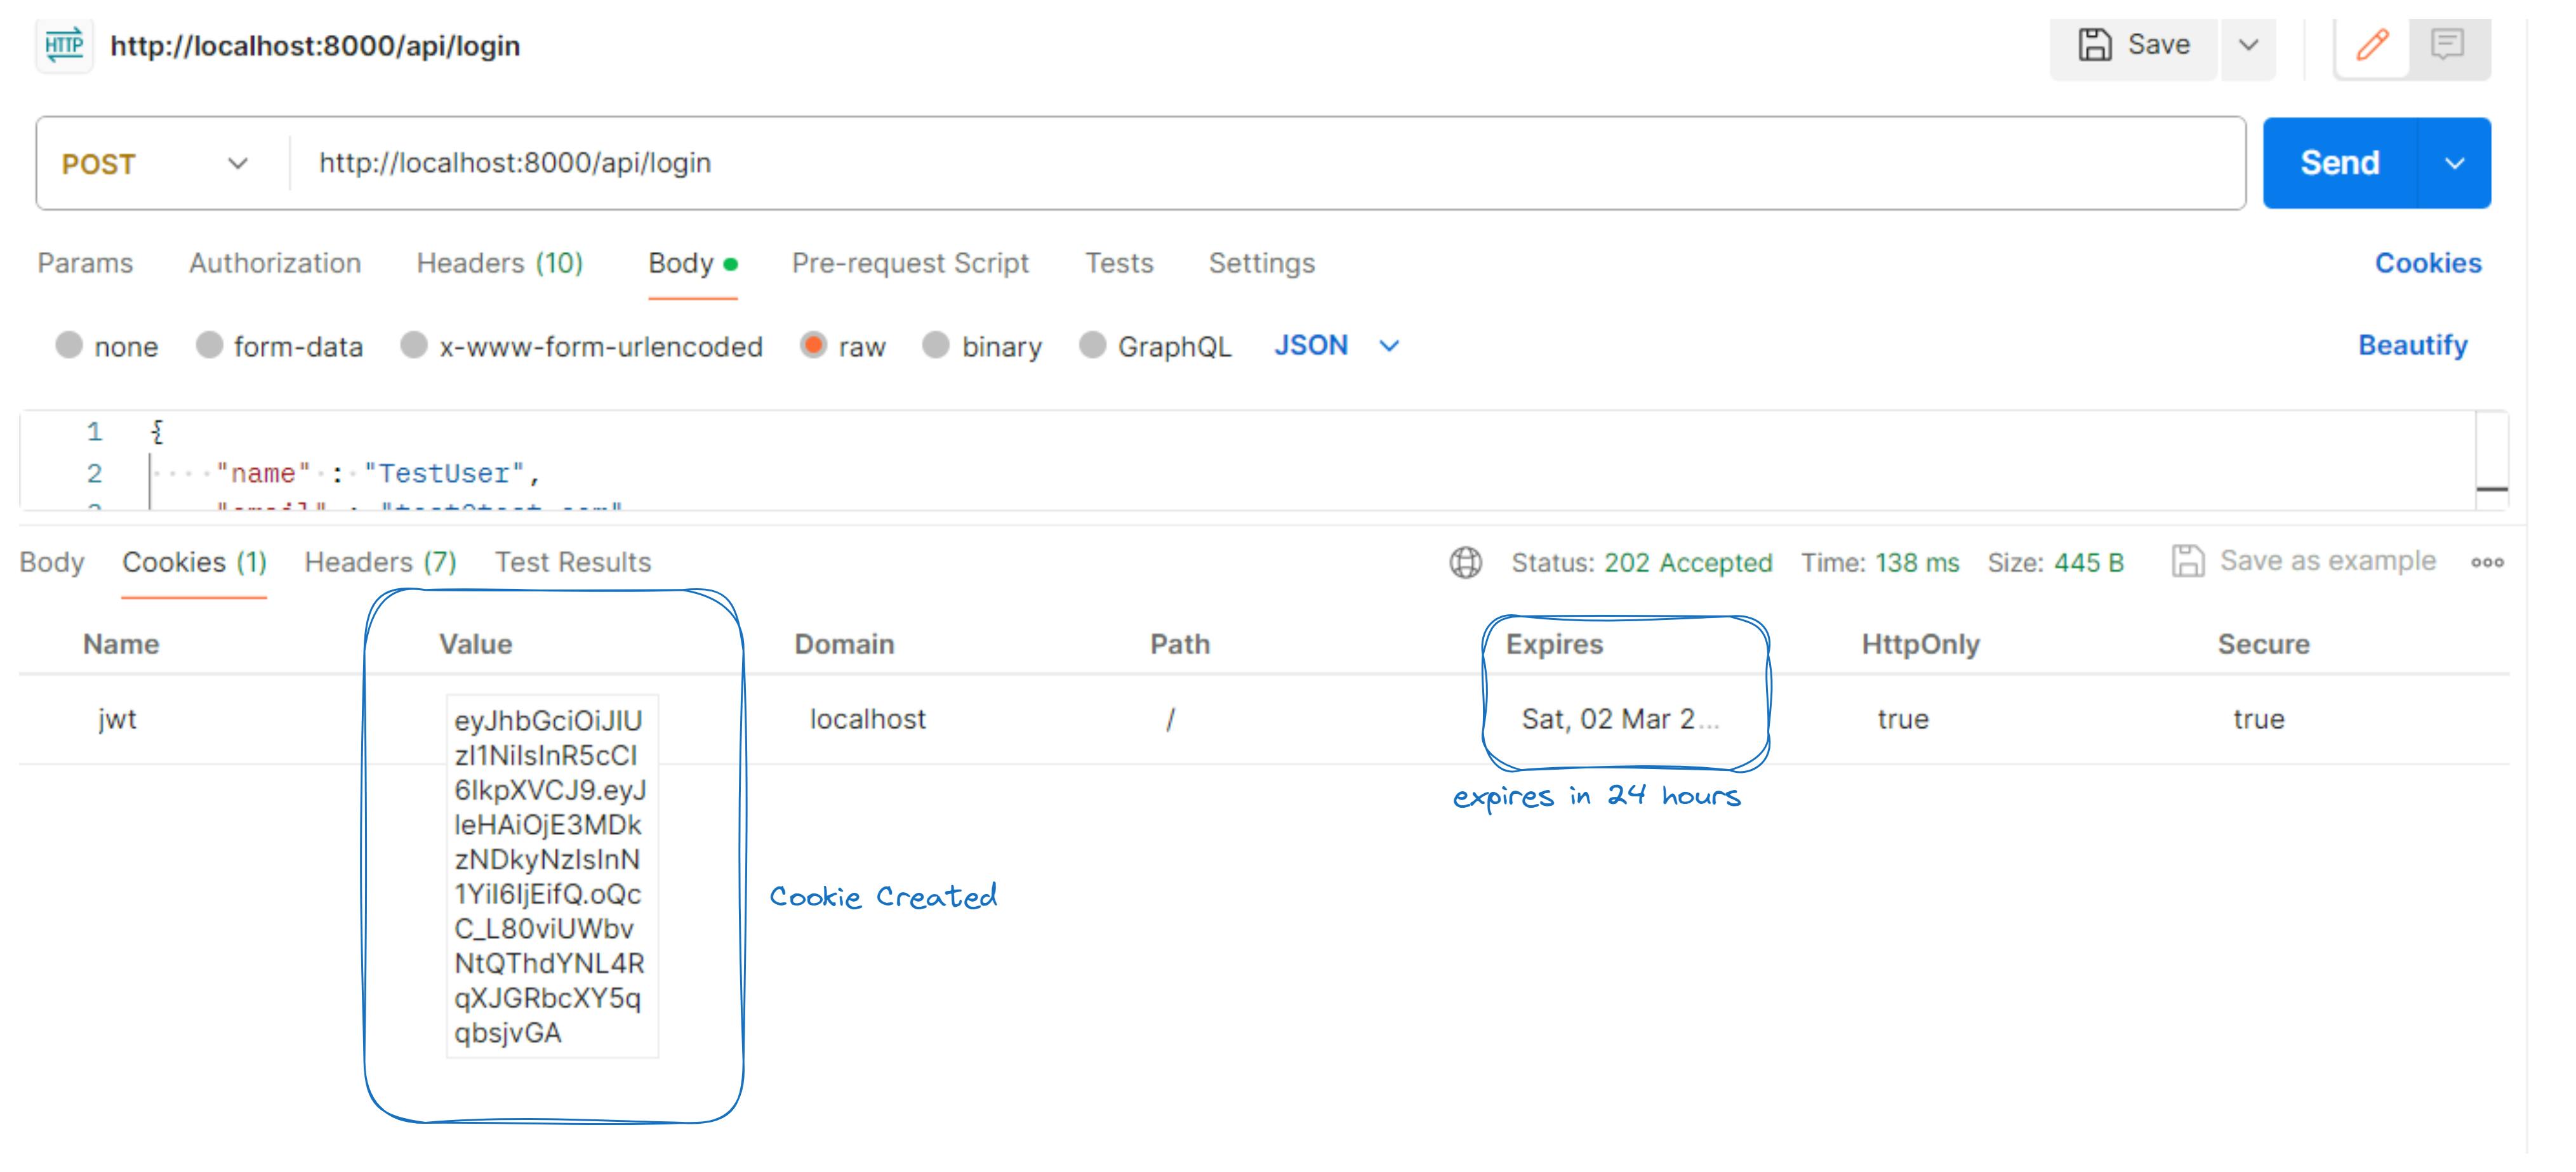
// Set JWT token in cookie
cookie := fiber.Cookie{
Name: "jwt",
Value: token,
Expires: time.Now().Add(time.Hour * 24), // Expires in 24 hours
HTTPOnly: true,
Secure: true,
}
c.Cookie(&cookie)
// Authentication successful, return success response
return c.Status(fiber.StatusAccepted).JSON(fiber.Map{
"message": "Login successful",
})
}
Add the new login router in routes package. Your
SetupRoutesfunction will now look like below// routes/routes.go func SetupRoutes(app *fiber.App) { app.Get("/", controllers.Hello) app.Post("/api/register", controllers.Register) app.Post("/api/login", controllers.Login) }
Explanation of the code:
Input Parsing: The
Loginfunction parses the request body into a map of strings using Fiber'sBodyParser, extracting email and password data.User Retrieval: It retrieves the user corresponding to the provided email from the database using GORM's
Wheremethod.Password Verification: The function verifies the password by comparing the hashed password stored in the database with the password provided in the request using
bcrypt.CompareHashAndPassword.JWT Token Generation: If the password is correct, it generates a JWT (JSON Web Token) using the user's ID as the subject (
"sub") and sets the expiration time ("exp").Setting JWT Token in Cookie: Set the JWT token in an HTTP cookie named
"jwt". The cookie is set to expire in 24 hours and is HTTP-only and secure to enhance security.Response: Finally, a JSON response confirming the successful login is returned to the client.
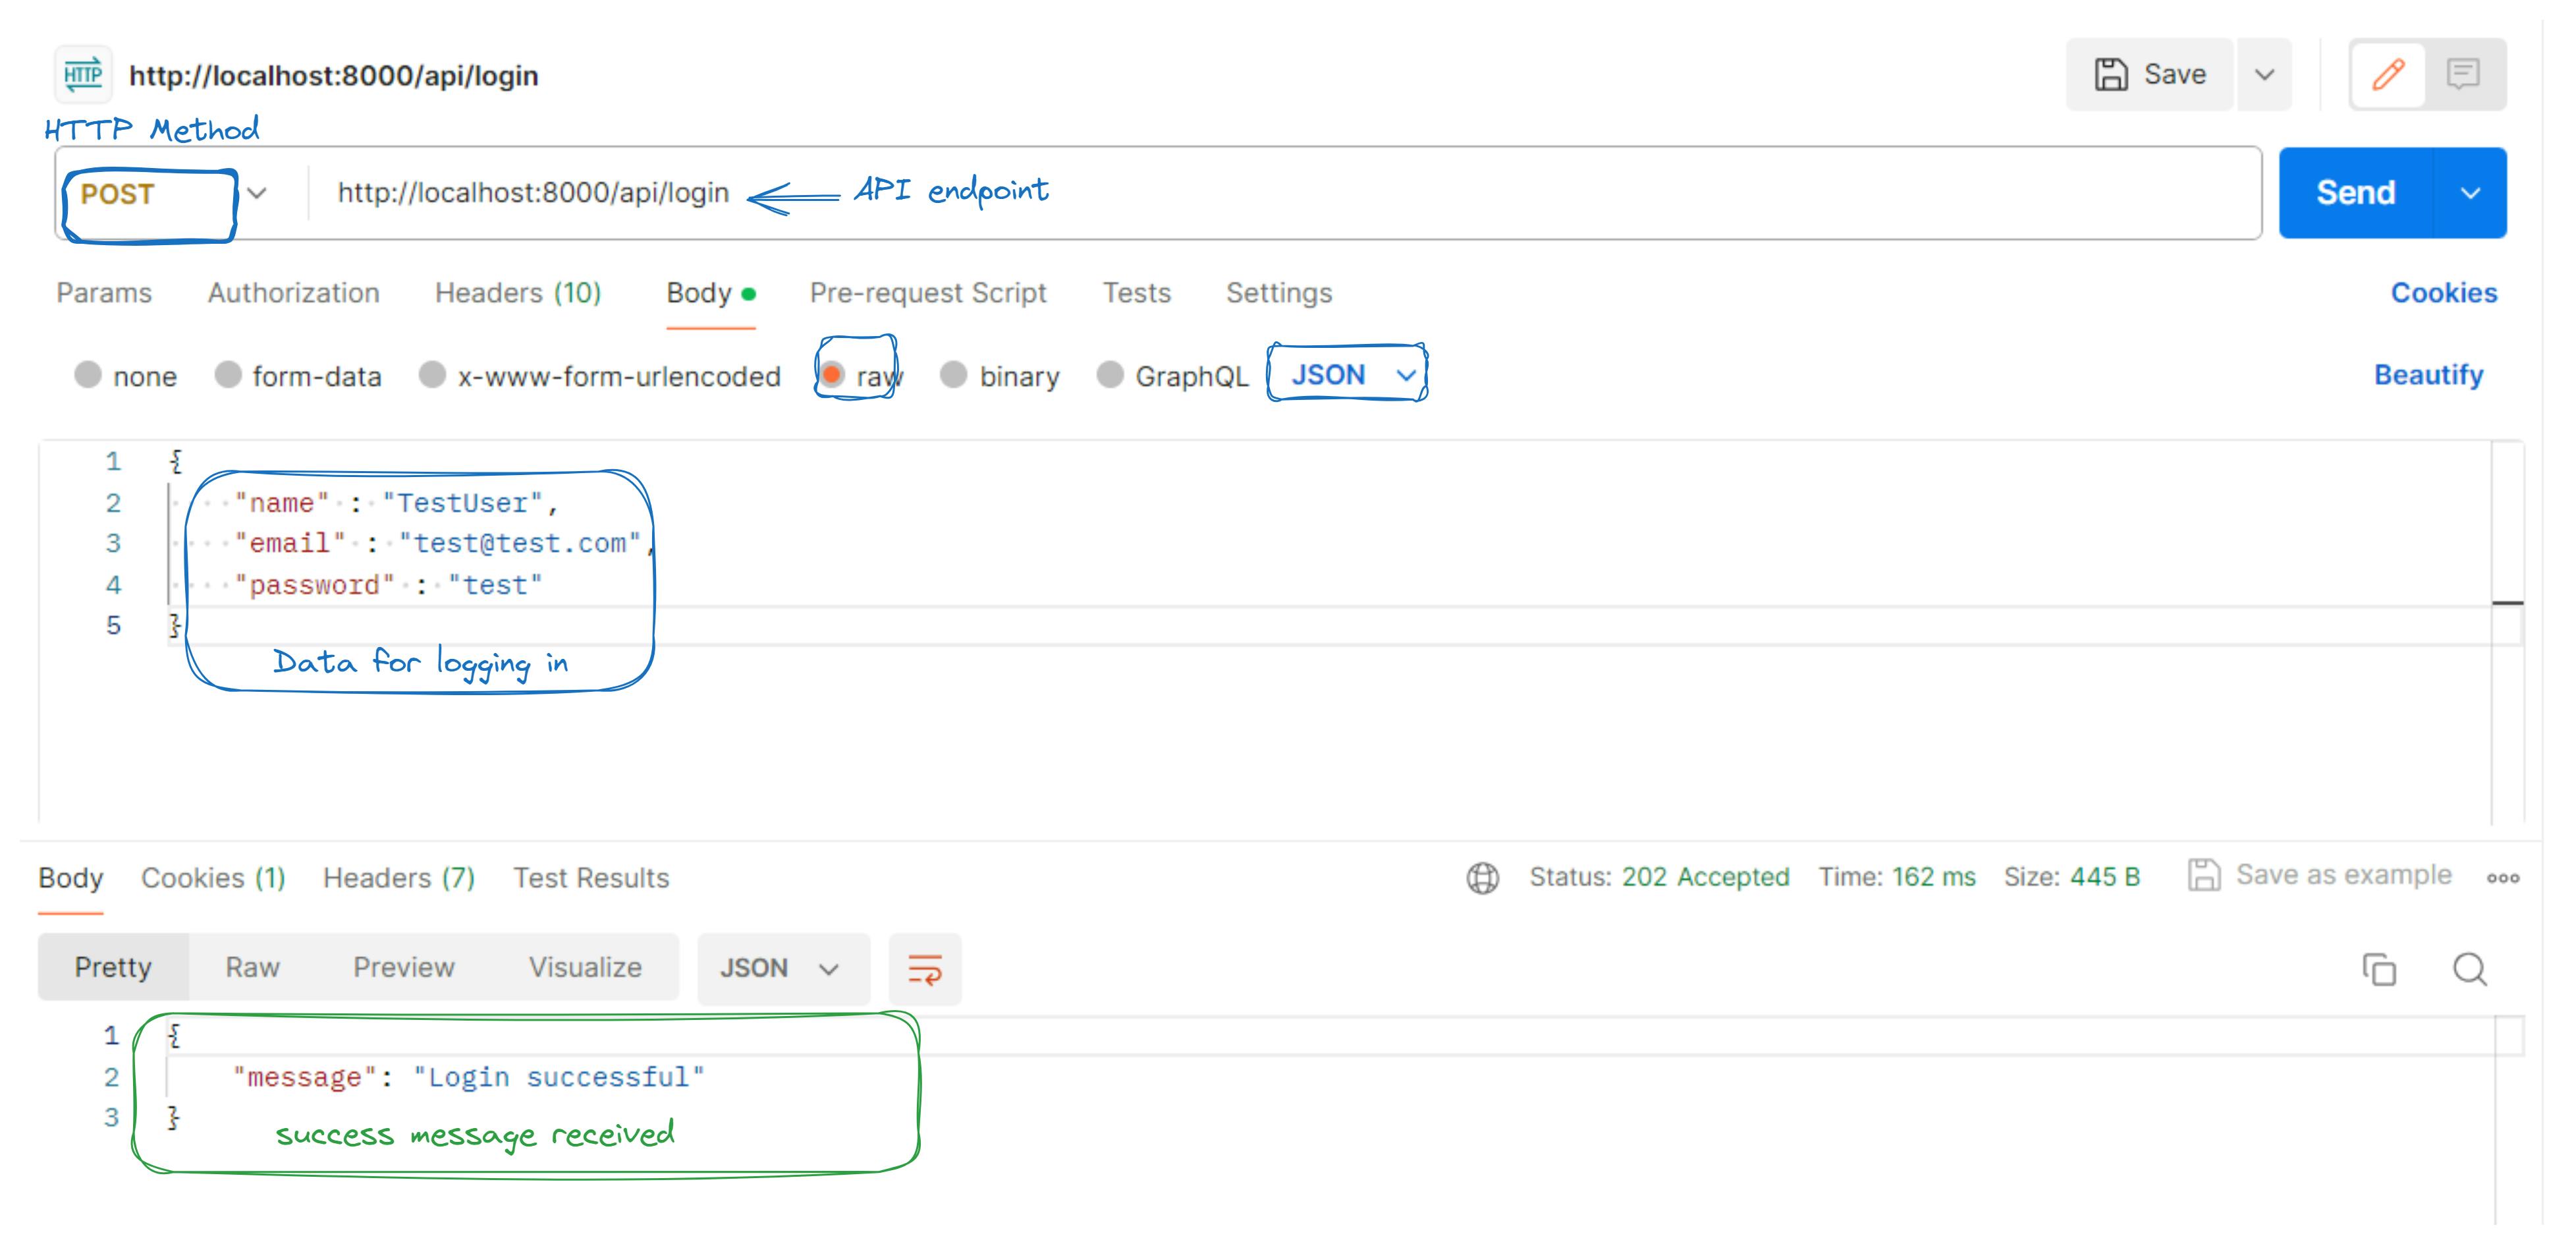
Test Login via Postman
Set Request Details and send:
Method:
POSTBody: radio button
raw, typeJSON- Include
name,email, andpasswordfields
- Include
Check Response: Verify the response:
Successful login: Status code
200 OKwith a success message.Errors: Appropriate status code and error message.
- Check for cookies created
These steps allow you to efficiently test the login functionality using Postman, ensuring proper communication between the client and server.
Step 9: Implement User Retrieval Functionality
Now we check if we are successfully logged in
- Create a function to retrieve user information from the JWT token:
// controllers/authController.go
func User(c *fiber.Ctx) error {
    fmt.Println("Request to get user...")

    // Retrieve JWT token from cookie
    cookie := c.Cookies("jwt")

    // Parse JWT token with claims
    token, err := jwt.ParseWithClaims(cookie, &jwt.MapClaims{}, func(token *jwt.Token) (interface{}, error) {
        return []byte(secretKey), nil
    })

    // Handle token parsing errors
    if err != nil {
        return c.Status(fiber.StatusUnauthorized).JSON(fiber.Map{
            "error": "Unauthorized",
        })
    }

    // Extract claims from token
    claims, ok := token.Claims.(*jwt.MapClaims)
    if !ok {
        return c.Status(fiber.StatusInternalServerError).JSON(fiber.Map{
            "error": "Failed to parse claims",
        })
    }

    // Extract user ID from claims
    id, _ := strconv.Atoi((*claims)["sub"].(string))
    user := models.User{ID: uint(id)}

    // Query user from database using ID
    database.DB.Where("id =?", id).First(&user)

    // Return user details as JSON response
    return c.JSON(user)
}
Add the new login router in routes package. Your
SetupRoutesfunction will now look like below// routes/routes.go func SetupRoutes(app *fiber.App) { app.Get("/", controllers.Hello) app.Post("/api/register", controllers.Register) app.Post("/api/login", controllers.Login) app.Get("/api/user", controllers.User) }
Explanation of the code:
JWT Token Retrieval: The
Userfunction retrieves the JWT token from the HTTP cookies usingc.Cookies("jwt").JWT Token Parsing: It parses the JWT token using the
jwt.ParseWithClaims()function, where the claims are stored in ajwt.MapClaimsstruct. ThesecretKeyis used for verifying the token signature.Claims Extraction: It extracts the claims from the parsed JWT token. The user ID is extracted from
"sub"claim.User Retrieval: The function retrieves the user from the database based on the extracted user ID.
Response: Finally, the user data is returned as a JSON response to the client.
Test Logged in User via Postman
Set Request Details and Send:
Method:
GETURL:
http://localhost:8000/api/user/Body:
none
Send Request: Click "Send".
Check Response: Verify the response:
Successful login: Status code
200 OKwith a success message.Errors: Appropriate status code and error message.

Check for cookies retrieved
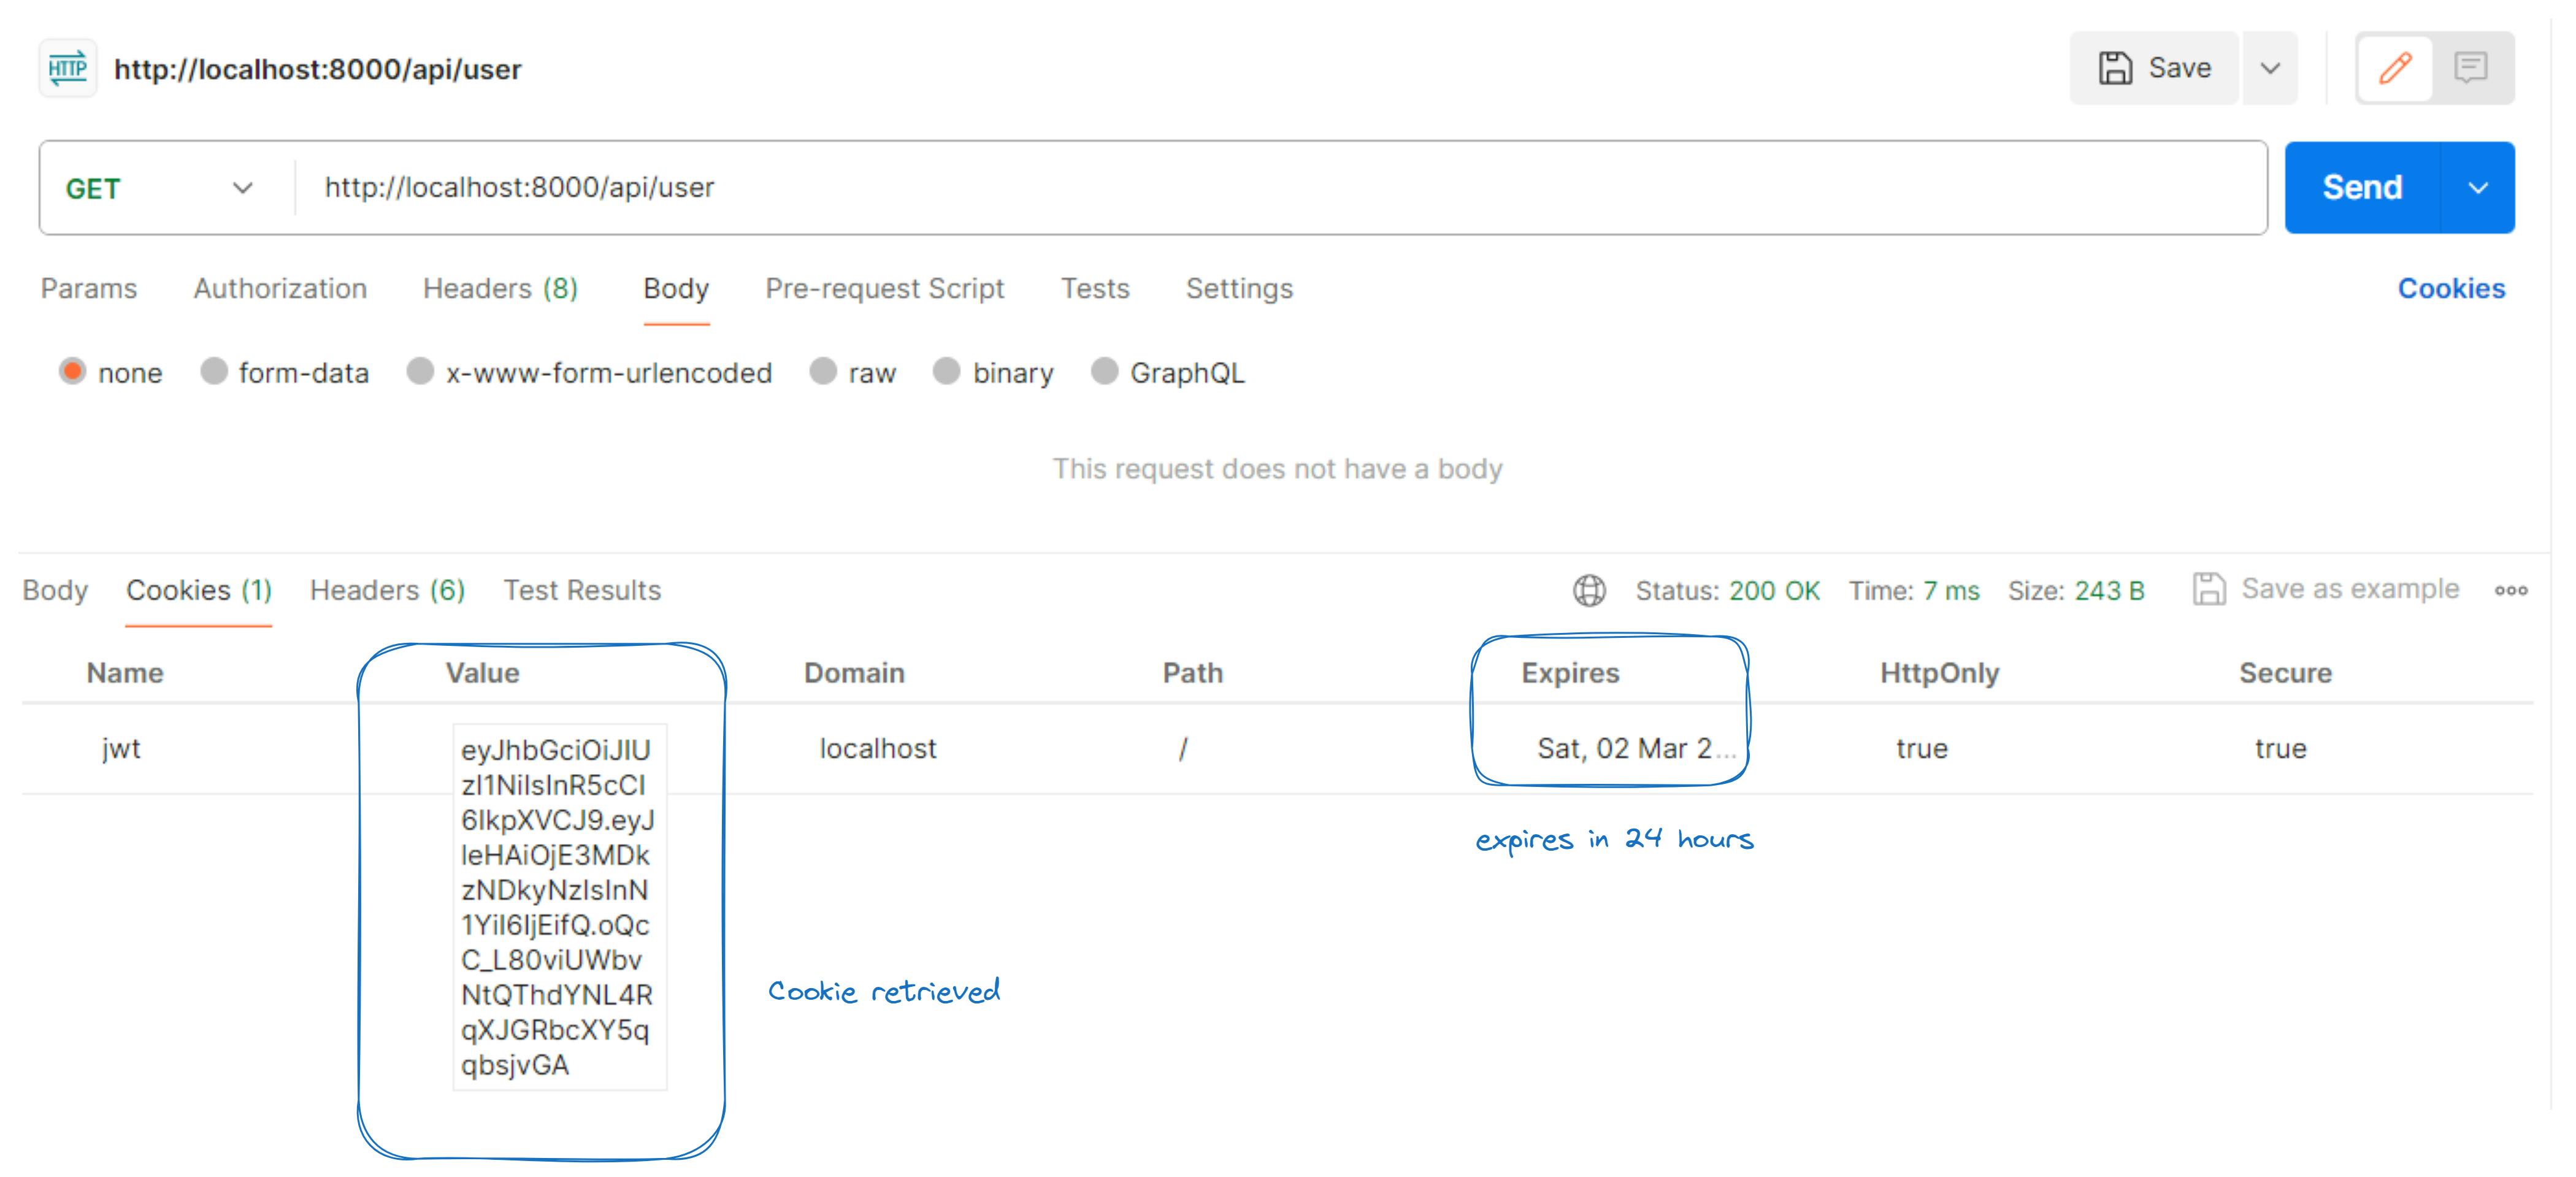
These steps allow you to efficiently test the logged in User's details functionality using Postman, ensuring proper communication between the client and server.
Step 10: Implement Logout Functionality
- Create a function to logout and remove the JWT token cookie:
// controllers/authController.go
func Logout(c *fiber.Ctx) error {
    fmt.Println("Received a logout request")

    // Clear JWT token by setting an empty value and expired time in the cookie
    cookie := fiber.Cookie{
        Name:     "jwt",
        Value:    "",
        Expires:  time.Now().Add(-time.Hour), // Expired 1 hour ago
        HTTPOnly: true,
        Secure:   true,
    }
    c.Cookie(&cookie)

    // Return success response indicating logout was successful
    return c.Status(fiber.StatusAccepted).JSON(fiber.Map{
        "message": "Logout successful",
    })
}
Add the new logout router in routes package. Your
SetupRoutesfunction will now look like below// routes/routes.go func SetupRoutes(app *fiber.App) { app.Get("/", controllers.Hello) app.Post("/api/register", controllers.Register) app.Post("/api/login", controllers.Login) app.Get("/api/user", controllers.User) app.Post("/logout", controllers.Logout) }
Explanation of the code:
JWT Token Expiry: The
Logoutfunction expires the JWT token cookie by setting its value to an empty string and its expiry time to a past date, effectively invalidating the token.HTTP Cookie Update: It updates the HTTP cookie named "jwt" with the expired token information, ensuring that the client's session is terminated.
Response: Upon successful logout, a JSON response with a message indicating "Logout successful" is sent back to the client.
Test Logging out via Postman
Set Request Details and Send:
Method:
GETURL:
http://localhost:8000/api/logout/Body:
none
Send Request: Click "Send".
Check Response: Verify the response:
Successful login: Status code
200 OKwith a success message.Errors: Appropriate status code and error message.
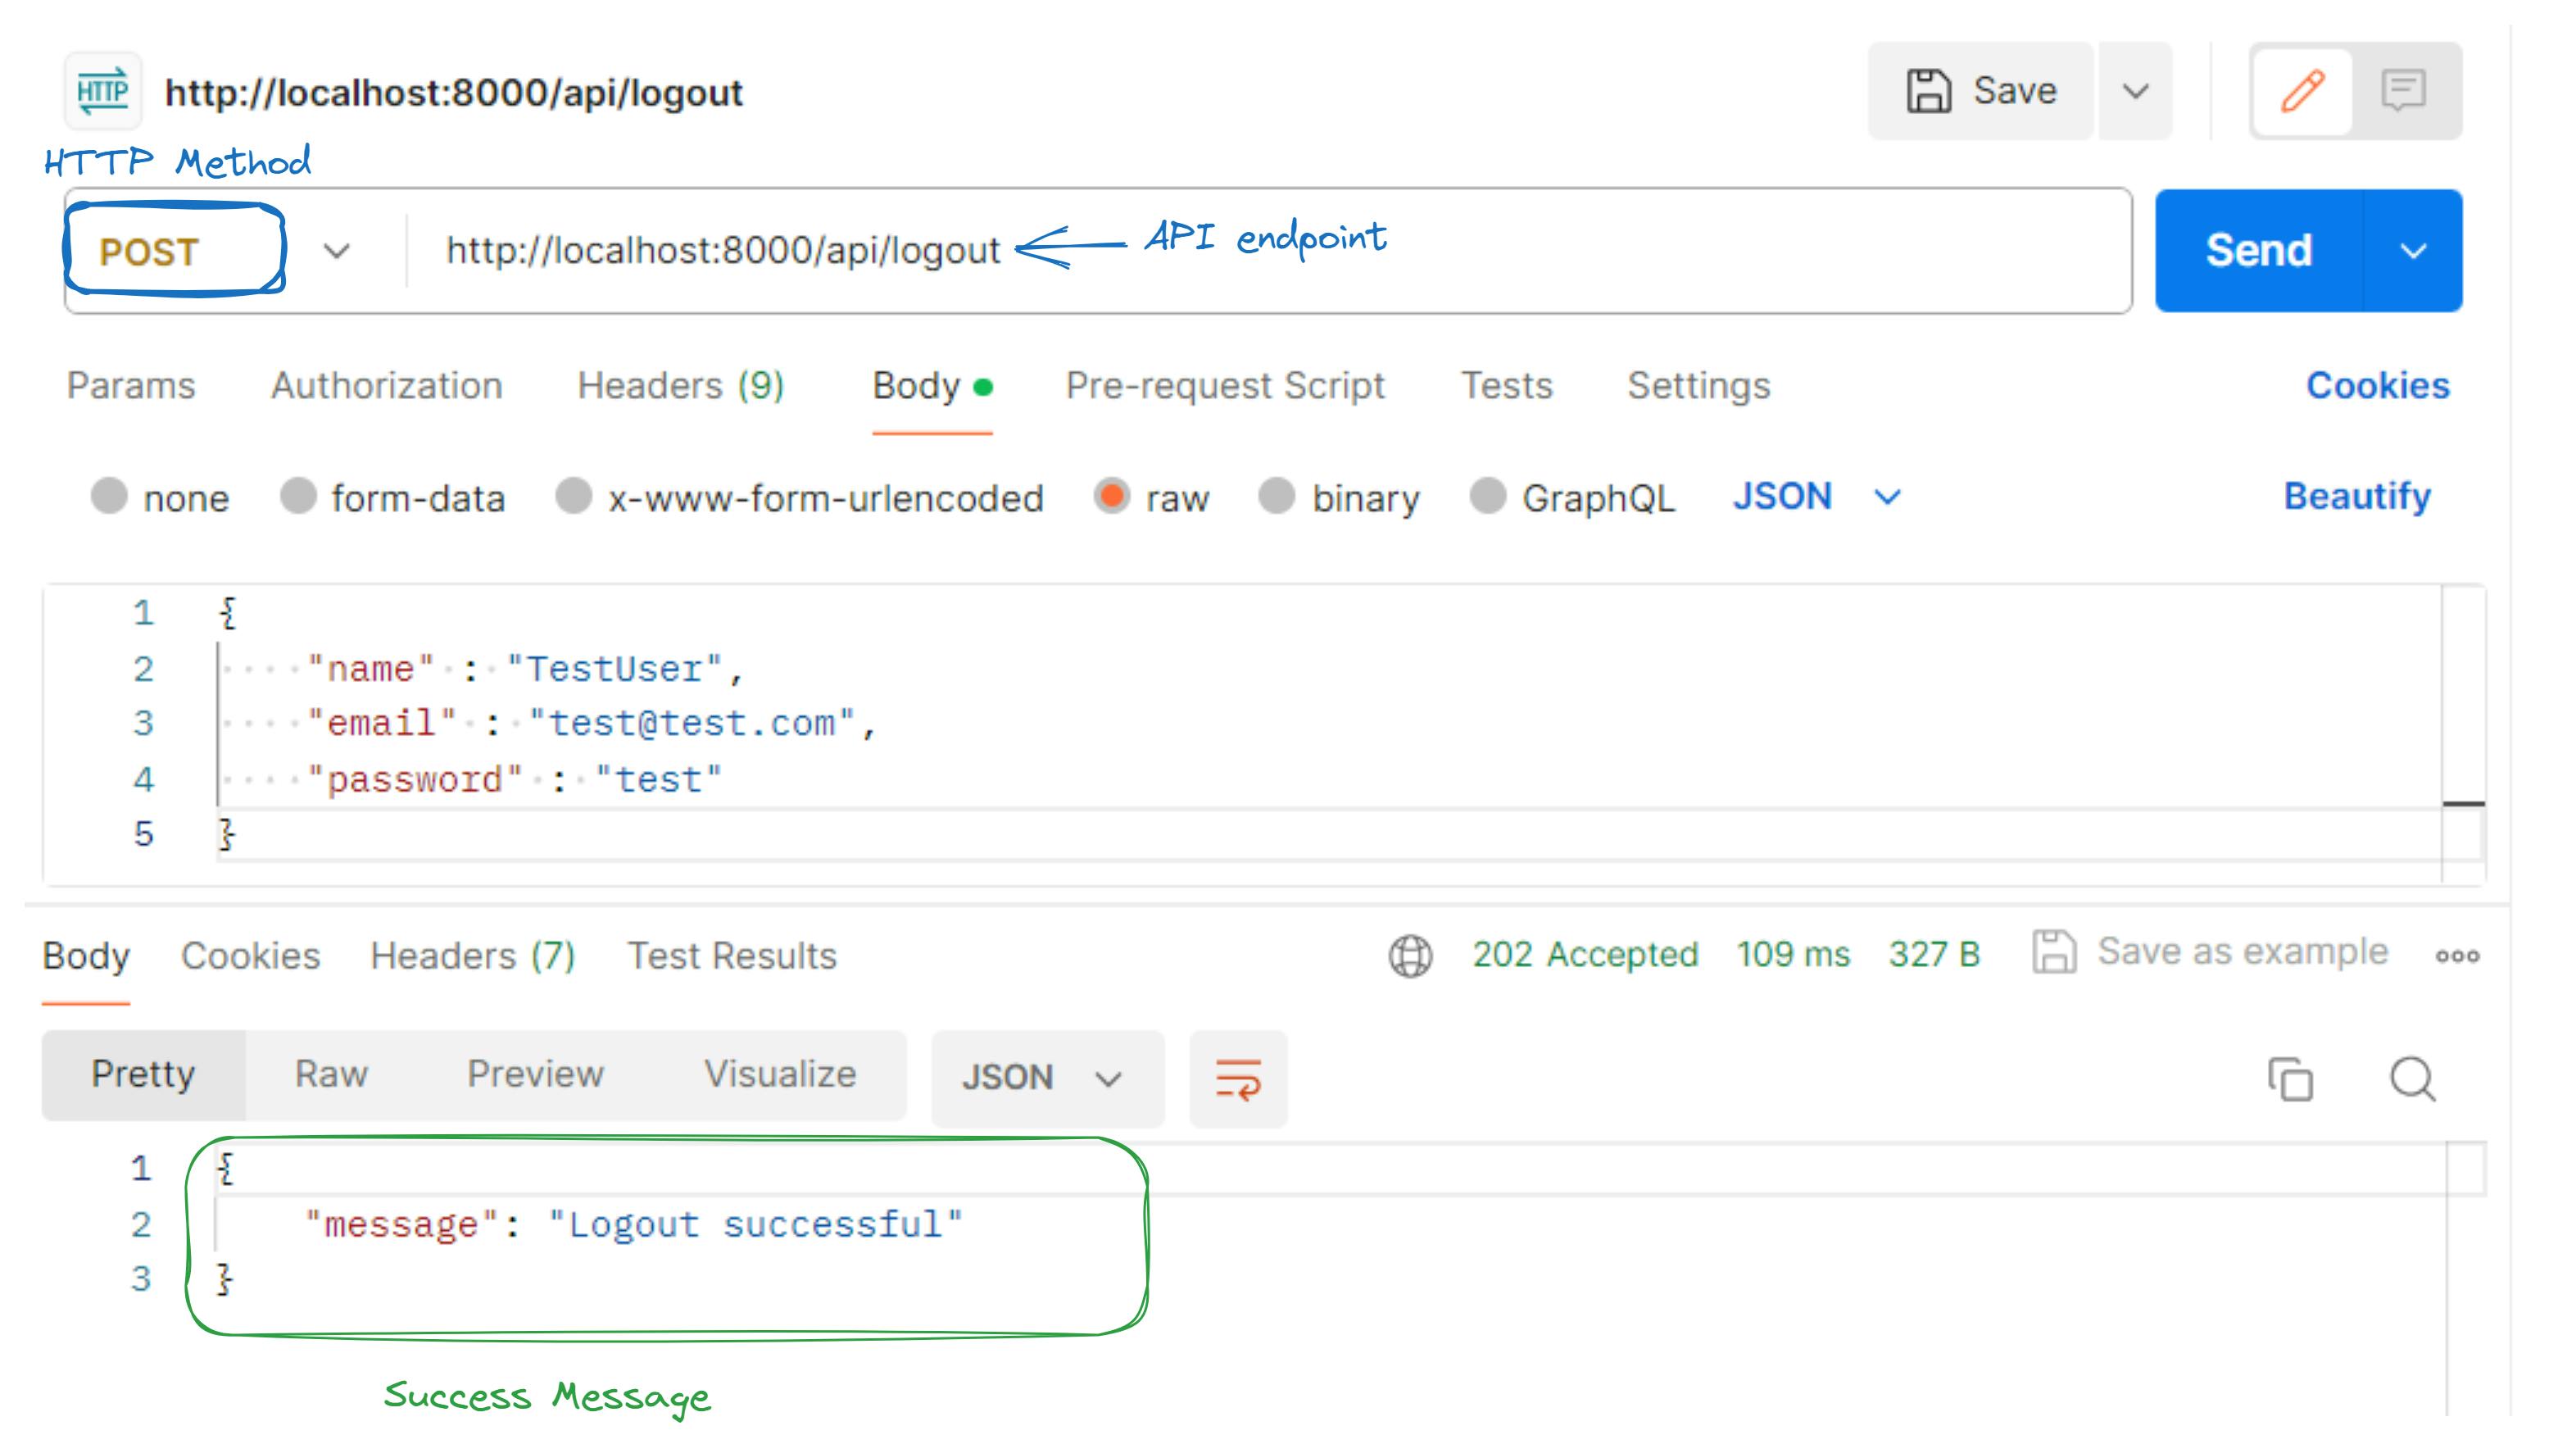
Check for /api/user if the user is still available
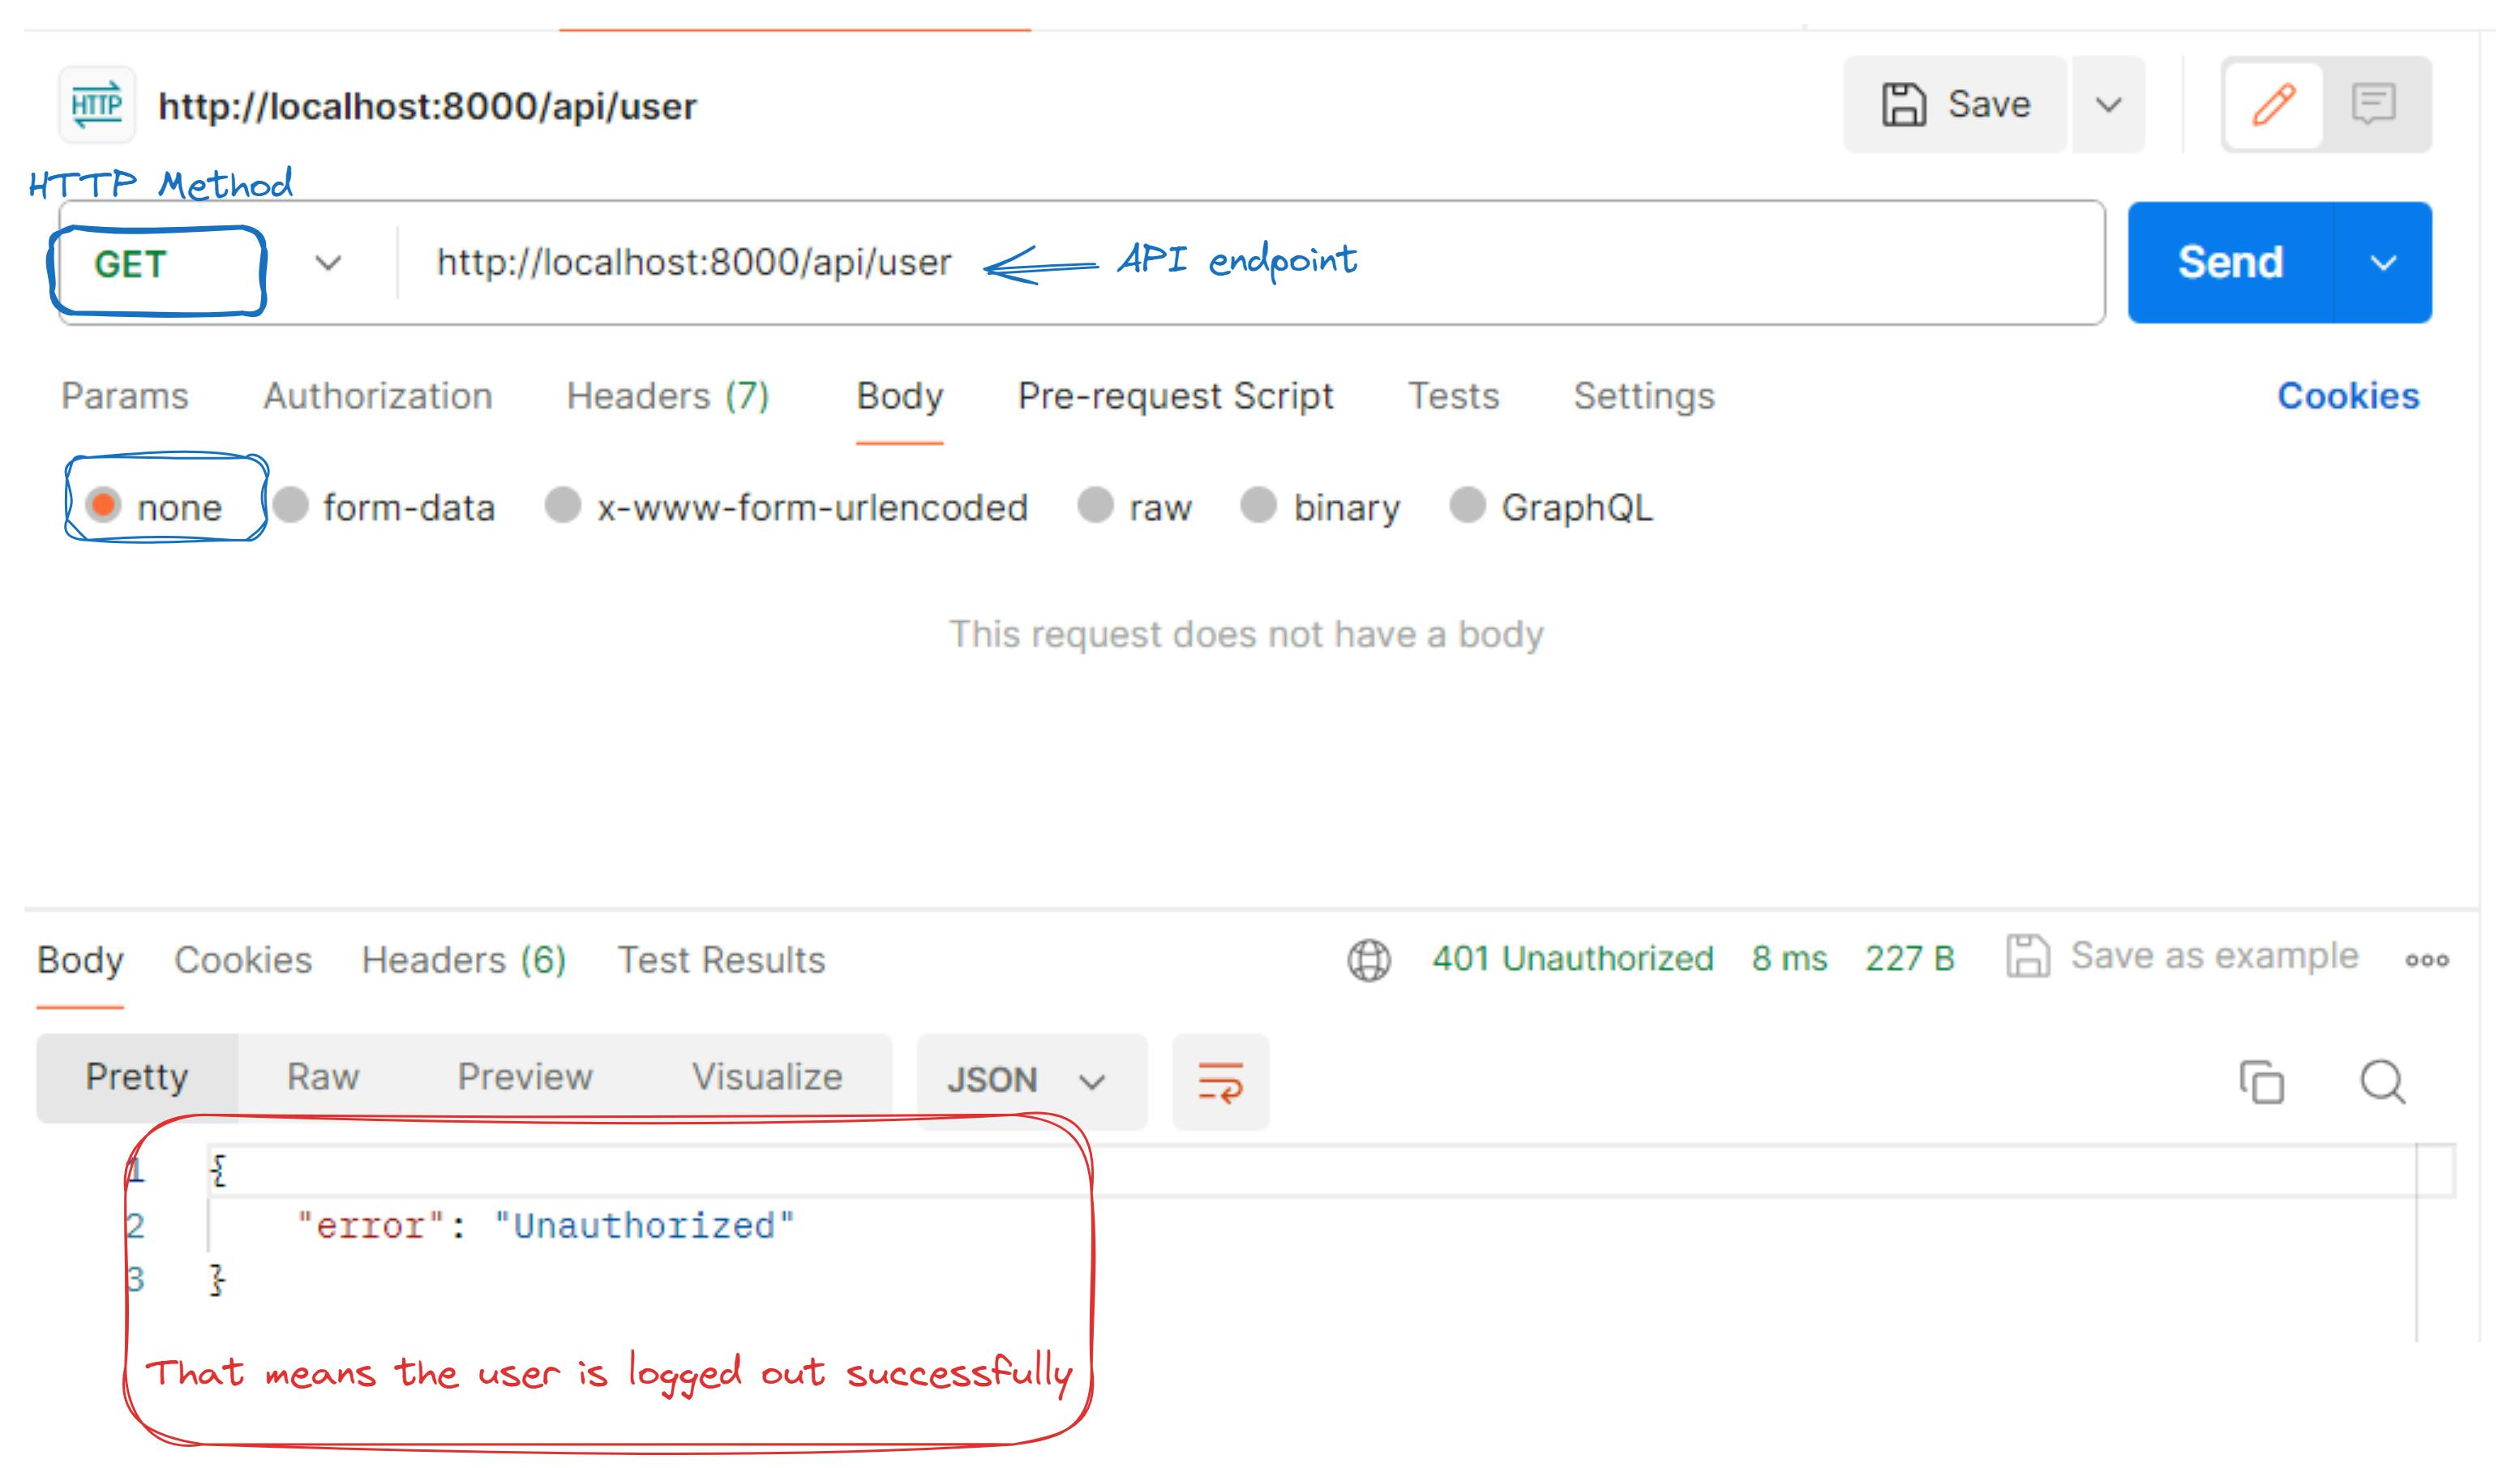
These steps allow you to efficiently test the logging out functionality using Postman, ensuring proper communication between the client and server.
Conclusion
Congratulations! You've successfully implemented user authentication in Golang using the Fiber framework. Test your endpoints using Postman or any other API testing tool to ensure everything works as expected.