


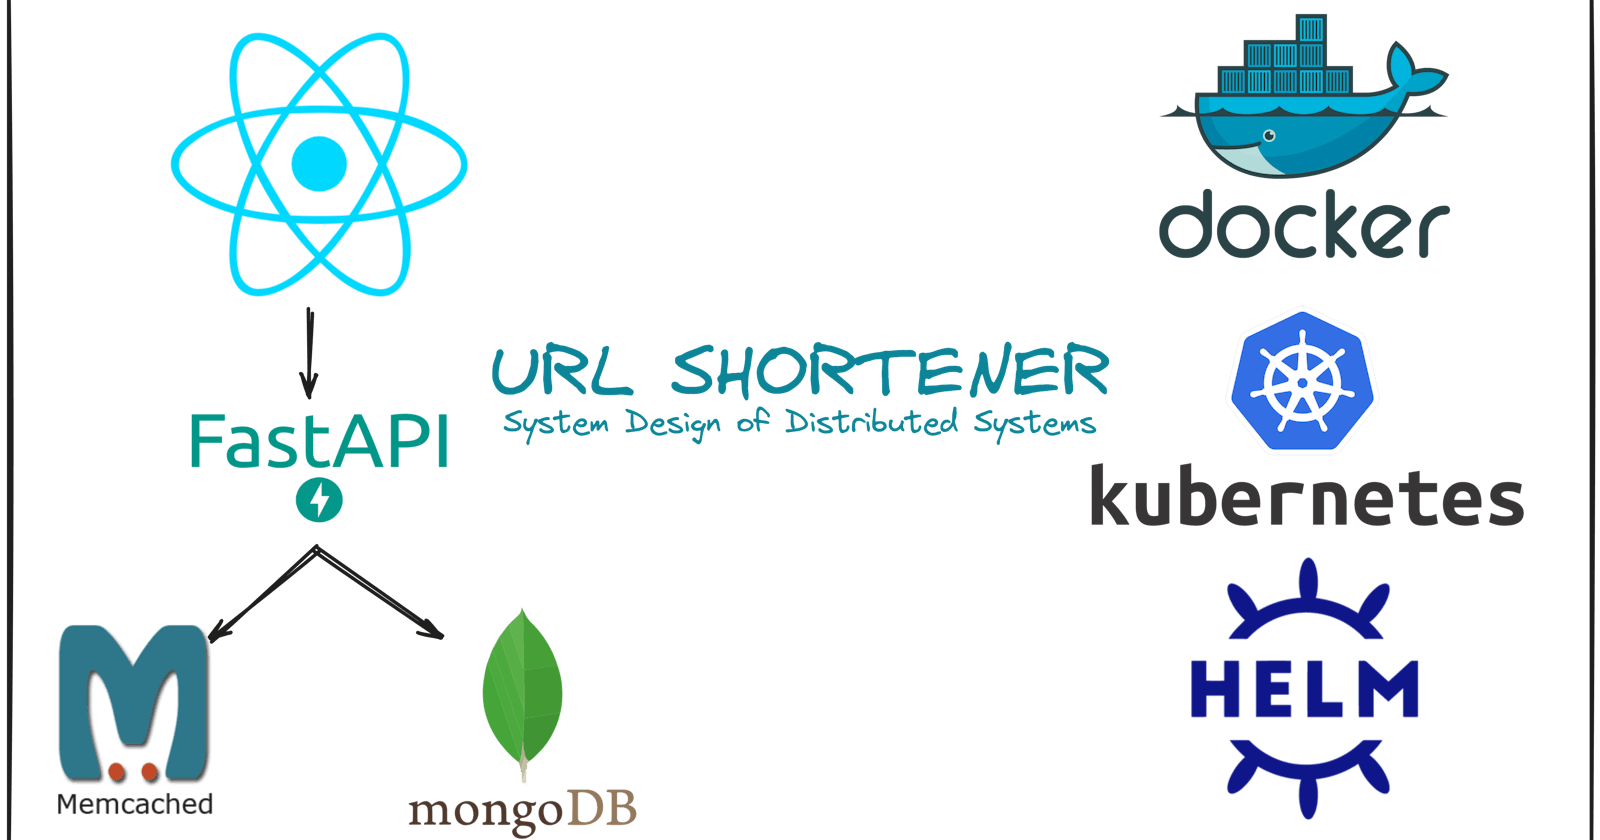
The "URL Shortening Service" project providing users with shorter links for easier sharing. It efficiently handles massive volumes of URLs daily and ensures essential functionalities like URL shortening and redirection. Powered by technologies like React, FastAPI, MongoDB, and Memcached, the project emphasizes scalability and efficiency. Deployment is made seamless through Docker and Kubernetes with Helm, showcasing a modern approach to web application architecture.
1. Project Overview
The "URL Shortening Service" project is a sophisticated system designed to efficiently shorten URLs, enabling users to generate shorter, more manageable links from longer ones.
Git Repository :- https://github.com/divaamahajan/URLshortening-distributed-system
Here's a breakdown of its components and functionalities:
1.1. Functional Requirements: Basic Use Cases
The system handles a significant traffic volume, generating 100 million URLs per day. Its primary use cases include:
URL Shortening: given a long URL => return a much shorter URL
URL Redirecting: given a shorter URL => redirect to the original URL
High Availability, Scalability, and Fault Tolerance
1.2. Non-Functional Requirements: Back of the Envelope Estimation
High Availability, Scalability, and Fault Tolerance
Write operation: 100 million URLs are generated per day.
- Write operation per second: 100 million / 24 /3600 = 1160 write per sec
Read operation: Assuming ratio of read operation to write operation is 10:1,
- Read operation per second: 1160 * 10 = 11,600 read per sec
Assuming the URL shortener service will run for 10 years,
- this means we must support 100 million 365 10 = 365 billion records of short URL.
Assume average URL length is 100.
- Storage requirement over 10 years: 365 billion 100 bytes 10 years = 365 TB storage
1.3. System Architecture:
URL Shortening:
Input: Receive a longURL.
Forwarding: Send the request to FastAPI web servers via the load balancer.
Cache Check: Check if the longURL is cached. If so, retrieve the corresponding shortURL and return it.
Database Check: If the longURL is not in the cache, check the database. If found, return the corresponding shortURL.
Short URL Generation: If the longURL is not cached or in the database, generate a random short URL ensuring uniqueness. Create a new database entry with the shortURL and longURL, setting cache expiry for 1 hour.
URL Redirection:
User Interaction: User clicks on a short URL link (e.g., https://localhost:8000/zn9edcu).
Forwarding: Route the request to FastAPI web servers via the load balancer.
Cache Lookup: Check if the shortURL is cached. If found, return the corresponding longURL directly.
Database Query: If the shortURL is not in the cache, fetch the longURL from the database. If not found, indicate an invalid shortURL input.
Return: Return the longURL to the user.

1.4. API Endpoints:
API endpoints facilitate the communication between clients and servers. We will design the APIs REST-style.
URL shortening:
Method: POST
Path:
/longurlDescription: This endpoint shortens a long URL provided in the request body to a shorter version. If the long URL has already been shortened, it returns the existing short URL.
Request Body:
{"long_url": "https://example.com/very-long-url-to-shorten"}Response:
{"shortenedUrl": "http://localhost:8000/<short_url>"}
URL redirecting:
Method: GET
Path:
/{short_url}Description: This endpoint redirects the client to the original long URL associated with the provided short URL.
Parameters:
short_url: The short URL generated by the/longurlendpoint.
Response: Redirects the client to the original long URL.
API endpoints are defined in the routes.route module. When the FastAPI application is running, it automatically generates interactive documentation for the API. This documentation can be accessed at http://localhost:8000/docs in your web browser. It provides details about the endpoints, input parameters, and response formats, allowing users to explore and test the API interactively.
The system supports both 301 and 302 redirects, each with its pros and cons. 301 redirects are "permanent" and result in browser caching, reducing server load for subsequent requests. In contrast, 302 redirects are "temporary" and allow better tracking of click rates and sources.
1.5. URL Shortening algorithm
The system uses a randomized algorithm to generate short URLs. It selects a random length within a specified range and generates a short URL composed of alphanumeric characters. This algorithm ensures uniqueness and randomness in short URL generation.
The URL Shortening Service aims to support a vast number of URLs over 10 years. Let's see how many URLs can fit within a billion combinations using a maximum short URL length of 7 characters.
Max length of short URL: 7 characters
Character set: a-z, A-Z, 0-9 (62 characters)
| Length | Total Combinations |
| 1 | 62 |
| 2 | 3,844 |
| 3 | 238,328 |
| 4 | 14,776,336 |
| 5 | 916,132,832 |
| 6 | 56,800,235,584 |
| 7 | 3,521,614,606,208 |
Sum = 62 + 3,844 + 238,328 + 14,776,336 + 916,132,832 + 56,800,235,584 + 3,521,614,606,208 = 3,521,674,269,184
So, the sum is approximately 3,521.67 billion = 3.52167 trillion
The total combinations for lengths 1 to 7 sum up to approximately 3,521.67 billion, exceeding the requirement of 365 billion URLs over 10 years. Therefore, the chosen configuration allows accommodating the anticipated volume of URLs effectively.
1.6. Schema and Models:
Schemas, located in the schema directory, define the structure of documents in the database. They specify fields, data types, and validation rules.
    short_url: str
    long_url: str
Models, located in the models directory, represent and interact with data stored in MongoDB collections. They encapsulate CRUD operations and data validation logic. The UrlMappingModel class includes methods for:
Retrieving short URLs associated with long URLs.
Retrieving long URLs associated with short URLs.
Inserting URL mappings into the database.
To use these endpoints, send requests to the appropriate URL with the specified method and payload, and the backend server will respond accordingly.
1.7. Technology Stack:
Frontend: React
Backend: FastAPI
Data Storage: MongoDB
Caching: Memcache
Containerization and Orchestration: Docker, Kubernetes with Helm
1.8. Key Features:
URL Shortening: The system generates shorter, randomized URLs from longer ones, allowing users to share or distribute links more conveniently.
Scalability: Designed to handle a large volume of URLs, scaling from handling 100 million daily URLs initially to accommodating 3.5 trillion URLs over a span of 10 years. This scalability is crucial for accommodating growth and ensuring system performance remains optimal as usage increases.
Efficient Redirection: Utilizes Memcache for efficient caching of URL redirection mappings, enhancing the speed and responsiveness of redirection requests. This ensures a seamless user experience with minimal latency.
Containerization and Orchestration: Leveraging Docker and Kubernetes with Helm simplifies deployment and management, enabling automated scaling, rolling updates, and seamless deployment across different environments.
2. Setup and Prerequisites
2.1. Setting up MongoDB Atlas Database
Create MongoDB Atlas Account: Sign up for a MongoDB Atlas account on cloud.mongodb.com.
Set up a Cluster: Create a free cluster, choose your preferred cloud provider (AWS, etc.), select a region, and set a username/password for database access.
Configure Environment Variables: Create a
.envfile in the project root directory and add the following variables:MONGODB_USERNAME="your_username" MONGODB_PASSWORD="your_password"Replace
your_usernameandyour_passwordwith the credentials you set up earlier.Ensure that the MongoDB Atlas cluster is properly configured and accessible before running the backend server.
Database Configuration
Database configuration is managed in the configs.database module. To obtain a MongoDB Atlas connection string:
Go to the MongoDB Atlas web interface.
Locate the cluster you want to connect to.
Click the Connect button next to the cluster name.
Choose your connection method.
Copy the connection string and update the
uriin the database file.The FastAPI application uses this connection string to connect to the MongoDB Atlas cluster.
2.2. (Option 1) Running the Apps Locally
Install Python: Set up Python for the FastAPI backend server.
Install Node.js and npm: Ensure that you have Node.js and npm installed for the React frontend client. You can download and install Node.js from Node.js Downloads. npm is included with Node.js.
Install Memcached: Install Memcached for caching functionality and start it using
memcachedcommand.
2.3. (Option 2) Dockerization or Orchestration
- Sign up and Install DockerHub: Sign up for DockerHub and install Docker for containerization and orchestration capabilities.
3. Local Testing Without Docker
3.1. Run the backend Server
Navigate to the server directory
a. Create virtual environment
- Run the following command to create a virtual environment named
venv:
python3 -m venv venv
Once the virtual environment is created, you need to activate it.
On macOS and Linux:
source venv/bin/activateOn Windows:
venv\Scripts\activate
After activation, you should see
(venv)at the beginning of your command prompt, indicating that the virtual environment is active.When you're done working in the virtual environment, you can deactivate it by running the
deactivatecommand in the terminal.
b. Install Dependencies
Run the following command to install the required Python dependencies:
pip install -r requirements.txt
c. Start FastAPI Server
- update
memcache_hostof cache in cache config file file to connect to memcache running at http://localhost:11211
memcache_host = 'localhost'
- Run the following command to start the FastAPI server on port 8000:
uvicorn main:app --reload
The server is now running on http://localhost:8000
The
uvicorncommand is used to run the ASGI server. It automatically reloads the server when changes are detected in the source code.The main file used by
uvicornto run the server ismain.py. main-server python file.
3.2. Client Setup
Navigate to the client directory
a. Install Dependencies
Run the following command to install the required Node.js dependencies for the client:
npm install
b. Start Client
- update proxy key in package.json file to connect to server (backend) API running at http://localhost:8000
"proxy": "http://localhost:8000",
- Run the following command to start the client application on port 3000:
npm start
- The client is now running on http://localhost:3000 and you can start interacting with you application through this link
4. Dockerization
Here's how you can create Dockerfiles for both the client and server components of your URL shortening distributed system:
4.1. Configuring Cache and API Connections
Step 1. Update memcache_host of cache in cache config file file to connect to memcached running at http://memcachedcontainer:11211
memcache_host = 'memcachedcontainer'
This container name is given in docker-compose.yaml file under the service named memcached, where we specified that the container created from this service should be named memcachedcontainer. This naming convention can be helpful for identifying and managing containers when working with Docker.
Step 2. Update client's proxy key in package.json file to connect to server (backend) container's API
"proxy": "http://servercontainer:8000",
4.2. Option 1: Docker Compose
- Docker Compose is primarily used for orchestrating containers and defining multi-container applications on a single host or in a local development environment. This container name is given in
docker-compose.yamlfile underserviceskey, under the service namedserver, where we specified that the container created from this service should be namedservercontainer. This naming convention can be helpful for identifying and managing containers when working with Docker.
Step 3. Execute the following command to run both server and client containers using docker-compose:
docker-compose up -d
4.3. Option 2: Manual Docker Build and Run
Building Docker Images:
Step 3. Navigate to the root directory and run the following commands to build the Docker images:
# Build the server image
docker build -t serverimage ./server

# Build the client image
docker build -t clientimage ./client

# Pull Memcache Image
docker pull memcached
Running Docker Containers locally:
Step 4. After building the Docker images, you can run containers from these images using the following options:
# Create a custom network
docker network create mynetwork

# Running the Cache server
docker run --name memcachedcontainer -d --network mynetwork memcached

# Running the Backend Server:
docker run -d -p 8000:8000 --name servercontainer --network mynetwork --env-file ./server/.env serverimage

# Running the Frontend Client
docker run -d -p 3000:3000 --name clientcontainer --network mynetwork --link servercontainer:server clientimage
- This command maps port 8000 of the host to port 8000 of the container for the server, and port 3000 of the host to port 3000 of the container for the client.
These Dockerfiles enable you to containerize both the server (FastAPI backend) and the client (React frontend) components of your URL shortening distributed system. Now you can access the application on your DNS or localhost on port 3000 ex:- http://localhost:3000/
5. Deployment in Kubernetes Using Helm
A Helm chart is a package format for Kubernetes applications. It contains all the Kubernetes manifest files (such as Deployments, Services, ConfigMaps, etc.) necessary to deploy and manage a specific application or service in a Kubernetes cluster. Helm charts are used to streamline the process of deploying complex applications in Kubernetes by encapsulating all the required configuration and dependencies into a single package.
In short, a Helm chart can be compared to Docker Compose in the sense that both are tools used for deploying and managing applications, but they operate at different levels: -- Docker Compose orchestrates containers for multi-container applications locally. Helm charts deploy applications in Kubernetes, simplifying management in distributed environments. -- Docker Compose handles application-level orchestration, while Helm charts manage deployment and dependencies at the Kubernetes infrastructure level.
5.1. Configuring Cache and API Connections:
Step 1. Update memcache_host of cache in cache config file file to connect to memcached
memcache_host ='urlcache-memcached.default.svc.cluster.local' # to run in K8s
This memcached service name and namespace is created while creating server's helm chart. This naming convention can be helpful for identifying and managing containers when working with Kubernetes.
Step 2. Update client's proxy key in package.json file to connect to server (backend) container's API
"proxy": "http://urlserver-service-urlserver-helm.urlserver-namespace.svc.cluster.local:8000",
This backend service name and namespace is created while creating server's helm chart. This naming convention can be helpful for identifying and managing containers when working with Kubernetes.
Same asStep 3fromBuilding Docker Imagesmanually above
Step 3 Navigate to the root directory and run the following commands to build the Docker images:
# Build the server image
docker build -t serverimage ./server

# Build the client image
docker build -t clientimage ./client
5.2. Creating Helm Chart
Make sure kubernetes is enabled in your dockerhub settings
a. for memcached
- Execute below command to upgraded or install the Helm chart (which has service and deployments) named
urlcacheinto the Kubernetes cluster, using the Helm chart by aartifact.
helm upgrade --install urlcache oci://registry-1.docker.io/bitnamicharts/memcached
- Check the created with below command
kubectl get services -n default
Example output:
NAME                 TYPE        CLUSTER-IP     EXTERNAL-IP   PORT(S)     AGE
kubernetes           ClusterIP   10.96.0.1      <none>        443/TCP     30h
urlcache-memcached   ClusterIP   10.104.94.86   <none>        11211/TCP   34m
You received urlcache-memcached as your service name which can be used by client to connect with it.
b. for backend server
Navigate to backend server's server/helm/urlserver-helm directory
Execute below command to upgraded or install the Helm chart (which has service and deployments) named
urlserver-serviceinto the Kubernetes cluster, creating the namespaceurlserver-namespaceif it doesn't exist, using the Helm chart located in the current directory.
helm upgrade --install urlserver-service -n urlserver-namespace --create-namespace .
- Check the created with below command
kubectl get services -n urlserver-namespace
Example output:
NAME                               TYPE        CLUSTER-IP     EXTERNAL-IP   PORT(S)    AGE
urlserver-service-urlserver-helm   ClusterIP   10.105.226.2   <none>        8000/TCP   46m
You received urlserver-service-urlserver-helm as your service name which can be used by client to connect with it. to stop later you can usehelm uninstall urlserver-service -n urlserver-namespace
c. for client
Navigate to client's client/helm/urlclient-helm directory
Execute below command to upgraded or install the Helm chart (which has service and deployments) named
urlclient-serviceinto the Kubernetes cluster, creating the namespaceurlclient-namespaceif it doesn't exist, using the Helm chart located in the current directory.
helm upgrade --install urlclient-service -n urlclient-namespace --create-namespace .
6. Additional Notes:
- If you hosted your server on external DNS say EC2 machines, you can update the
DNSin utils file
7. References
System Design Interview – An Insider's Guide: Volume 2 Chapter 8: Design a URL shortener, by Alex Xu, Sahn Lam
How to Create a Flask + React Project | Python Backend + React Frontend by Arpan Neupane
Unlocking the Power of NoSQL: FastAPI with MongoDB by Eric Roby
Memcache Fundamentals in Python | Python PyMemcache Tutorial by Irtiza Hafiz
Dockerize FastAPI project like a pro - Step-by-step Tutorial by Stackless Tech
Complete Kubernetes Course | Deploy MERN app by Hitesh Choudhary